|
File
No.:

Title:
Still tangible evidence of
Operation Market Garden's
failure
Investigation made at: Several
locations in the Netherlands
and online databases
Period Covered:
17-26SEP1944
Date: 20AUG2025
Case
Classification:
Location of Historic
Events
Status
of Case:
Open Case
|
(click to
enlarge)
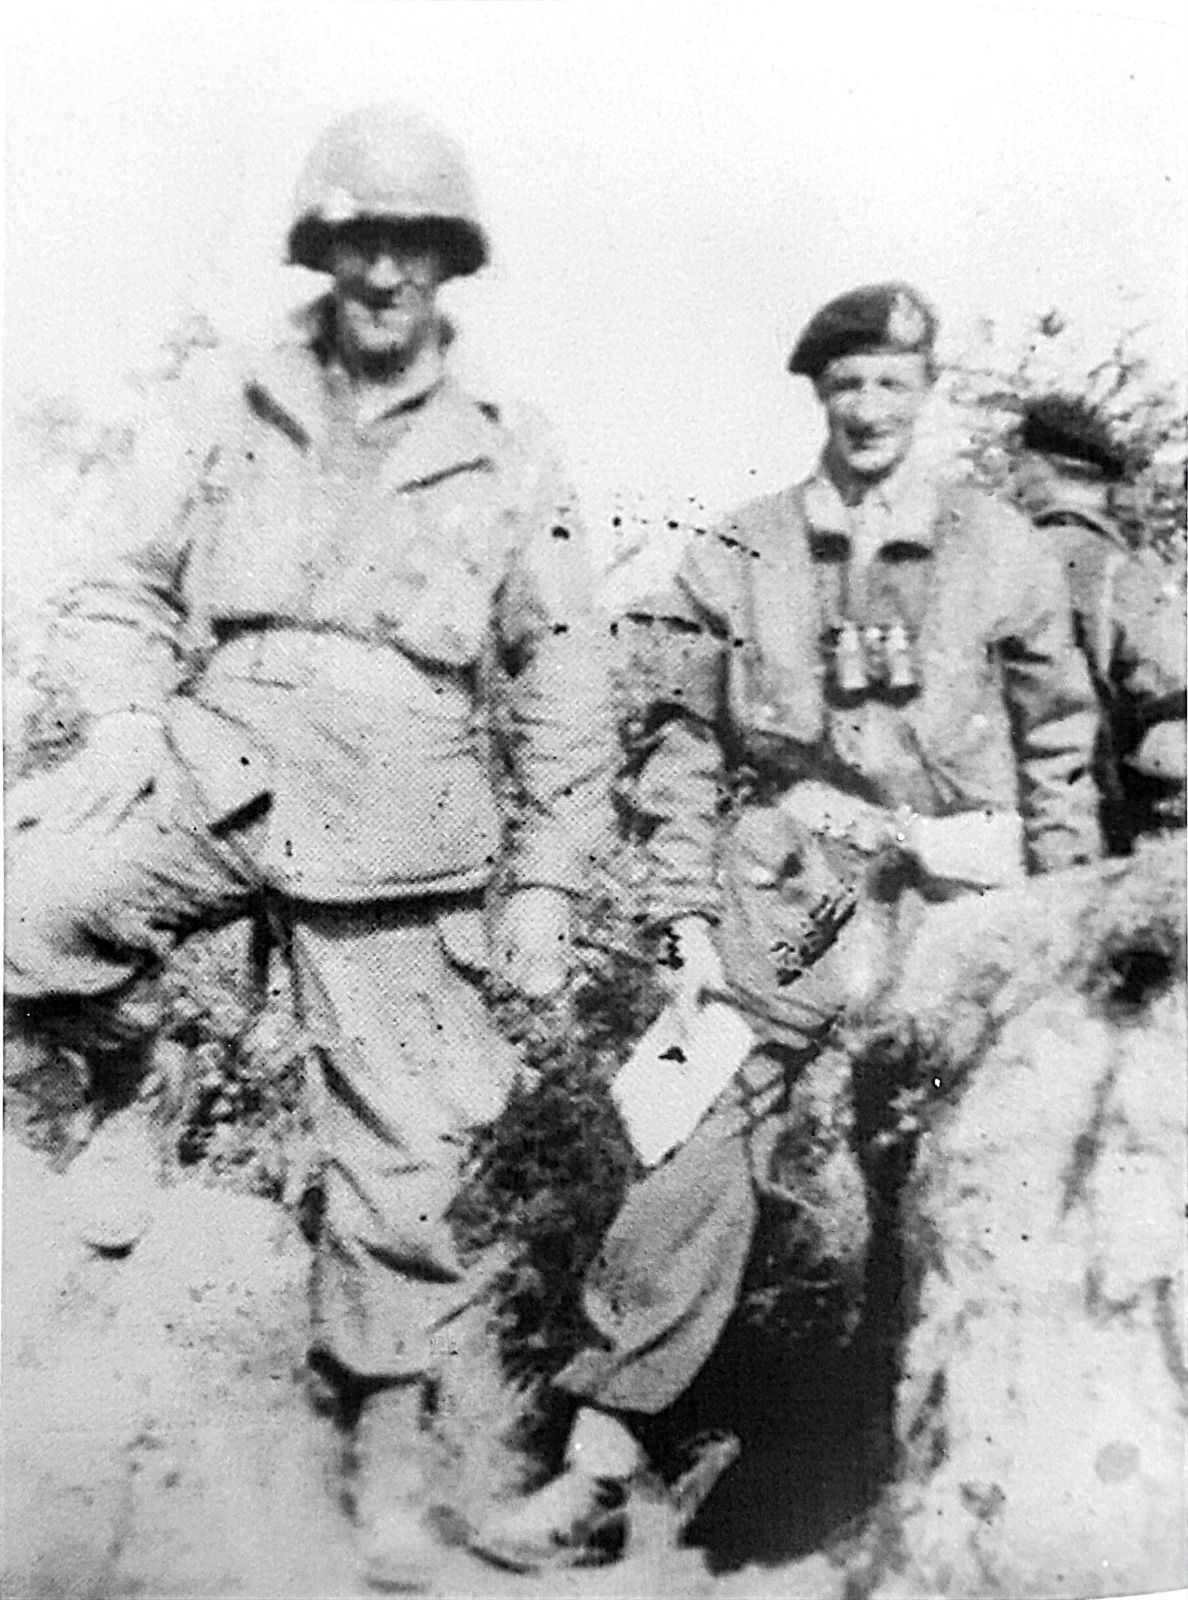
Fig.: General Browning (right
with beret), commanding officer of
1st Airborne Corps, has all the time
in the world to pose with American
Tech Corporal Matulovich of the 82nd
Airborne Division's artillery near
1st Airborne Corps Headquarters in Groesbeek. |
REASON FOR INVESTIGATION
Operation �Market Garden�,
the Allied combined arms assault
into the Netherlands with the
intention to establish a
bridgehead across the Rhine for
a ground army to advance into
the heartland of the Third
Reich, in September 1944, keeps
fascinating historians and
tacticians. The operation is one
of those great �might have been�
military stories, complete with
seemingly endless �what if
"-questions about what it was
that caused its eventual
failure.
What were the
contributing factors of
Operation �Market Garden� and
what was counteracting the
mission?
Moreover: what can
still be found as evidence of
these factors today?
This
agency mapped some of the �Still
tangible evidence of Operation
Market Garden�s failure�.
SYNOPSIS:
Categories of Errors
In general three categories of
errors that led to the failure
op Operation �Market Garden� can
be identified.
1) Errors in
the planning phase
Author
Antony Beevor, in his 2018 book
�Arnhem: the battle for the
bridges, 1944� (Penguin Books
Ltd, ISBN 9780670918676), argues
that the operation was already
flawed from the inception.
2) Errors in the execution phase
Author William Buckingham�s 2019
book �Arnhem: the complete story
of Operation Market Garden�
(Amberley Publishing, ISBN 10
1848681097 ) focusses on (mostly
British) command errors during
the operation.
Enter the
endless �what if� discussions.
�If only the weather had been
more favorable, or XXXth Corps
had kept advancing, or Nijmegen
bridge had been taken in the
first days of the operation�.
Cornelius Ryan�s 1974 book �A
Bridge Too Far� (Simon and
Schuster, ISBN 10: 024189073X)
is the best example of this
school of thinking.
3)
Errors in understanding the
opponent�s strength
Feldmarschall Helmut von Moltke,
who led the Prussian Army to
victory during the Wars of
German Unification in the
1800�s, noted that �no plan
survives contact with the
enemy.� As usual, soldiers have
a sharper way of expressing the
same thought: �The enemy has a
vote.�
This category of
errors emphasizes on
underestimating the German
strength and not foreseeing the
enemy�s response.
The best
literature on this subject can
be found in the works of Dutch
author Peter Berends in his
2003 Dutch language work �Een
andere kijk op de slag om
Arnhem, De snelle Duitse
reactie�(Uitgeverij Aspect, ISBN
90-5911-008-0) and his fellow
countryman Marcel
Zwarts� excellent �Einsatz
Arnheim, German armoured units
and their opponents at Arnhem
1944� (MZS Publishing, ISBN
978-90-834813-0-2) in English
and published in 2024.
We will elaborate on each of
these three categories and
explain several contributing and
counteracting military factors
of the operation. When
available, we present evidence
of these factors that can still
be found today. |
|
1. Errors in the
planning phase
At
the strategic level, Operation
�Market Garden� reflected the
uncertainty that permeated
Allied planning at this stage of
the war.
The Allied
inability to secure the port of
Antwerp in Belgium caused
enormous logistical problems.
The �Red Ball Express� truck
convoys, all the way from the
artificial Mulberry harbor in
Normandy and the port of
Cherbourg to the north of
Belgium, illustrate this
challenge of logistics. The
German 15th Army managed to keep
the Scheldt estuary (and
therefore Antwerp) closed for
too long. But to make matters
worse, the Allies let this whole
army escape in a German version
of the Dunkirk retreat. A force
of ten divisions was redeployed
to the Netherlands and the
German Ruhr area, where it could
make all the difference to the
German response to Operation
�Market Garden�.
Factor
Single Main Supply Route
Operation �Market Garden� was a
very ambitious mission. It
featured many moving parts and
relied on a single highway as
the Main Supply Route. The
British XXXth Corps gave the
Lommel to Arnhem highway the
tactical name �Club Route� but
the paratroopers of the American
101st Airborne Division, who
dealt with several German
attempts to cut the Allied
corridor, dubbed it �Hell�s
Highway� for obvious reasons.
The vulnerable route north gave
the enemy a constant opportunity
to thwart the operation: cut the
road and stop the advance.
|
(click to enlarge)
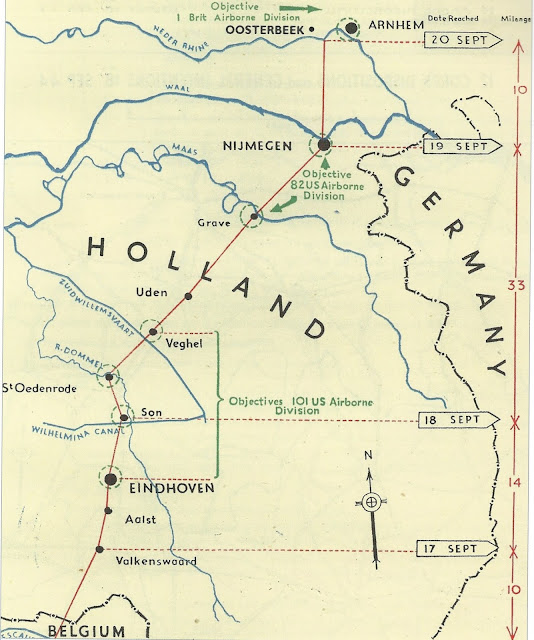
Fig.: Map showing the
Operational Plan for "Market
Garden"
with single Main
Supply Route and Phase Lines
indicating Nijmegen sould be
reached on D+2 (Tuesday
19SEP1944)
and Arnhem on
D+3. |
Factor Intelligence
The ease
and speed with which the Allies
had been able to give chase to
the Germans after the breakout
of the Normandy bridgehead had
led to the assumption that the
enemy was all but defeated.
Added to these weaknesses are
numerous poor choices made
during the planning phase. Best
known are the decision to spread
the airborne lifts over several
days, the selection of drop- and
landing zones too far from the
objectives, and the choice not
to deploy a �coup de main�
assault on the Arnhem road
bridge by inserting a raiding
party in its close proximity.
This had been proven successful
when capturing �Pegasus Bridge�
in Normandy in the night before
D-Day three months earlier.
|
Tangible Evidence of The
presence of a DZ\LZ in close
proximity to main objective
suitable for insertion of an
assault element:
1) In situ: photos taken
from DC3 on21MAY2011 of southern Rhine river
bank at Arnhem
|
(click to enlarge)
_small.jpg)
_small.jpg)
_small.jpg)
_small.jpg)
_small.jpg)
Fig.: Embankments south of
the Rhine river road bridge at
Arnhem in 2010. After these
photos were taken (by this
agency; see
Battle Study #21) the open
fields south of the river banks
have been deepened to serve as
alluvial plains in times of high
water marks rendering this area
far less suitable for an air
assault.
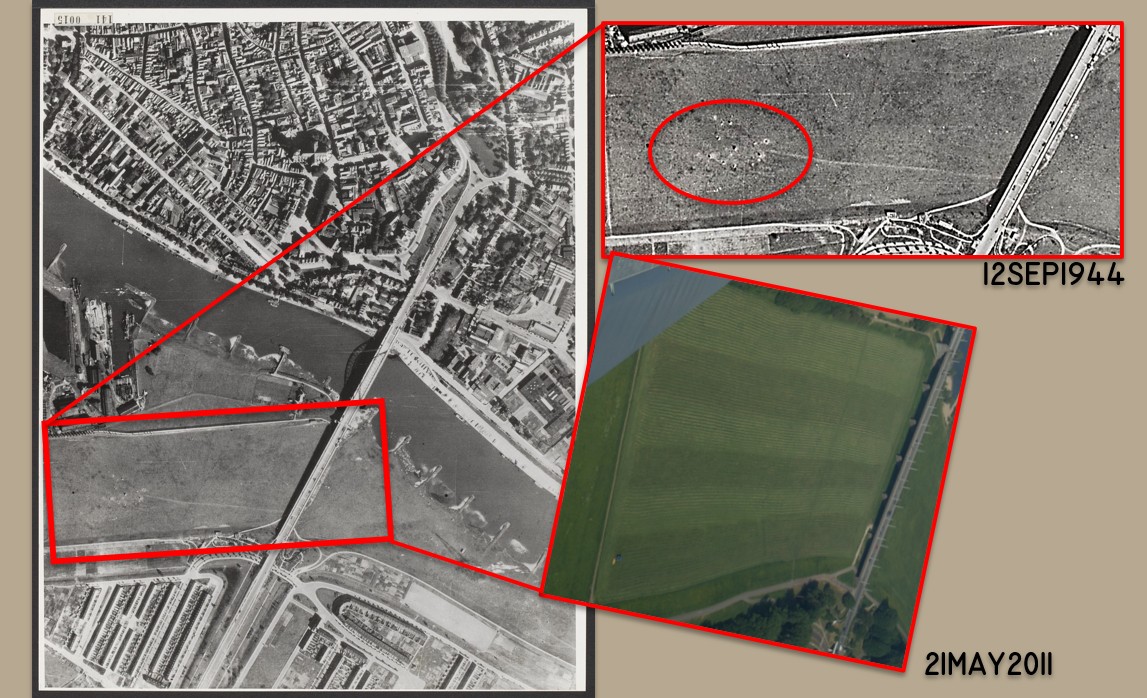
Fig.: Embankments south of
the Rhine river road suitabel
for a coup de main air assault.
Note Flak-positions in open
fields of flood plain which have
to be overtaken prior to second
wave air lifts. |
The Royal Air Force's main
argument against using these
flood plains for a coup de main
was that the fly-in route for
such an air assault would be
directed from west to east
following the river. Just west
of these flood plains was a
concentration of German Anti
Aircraft Artillery (AAA)
deployed there to protect the
Arnhem bridge from incoming
aircraft. This AAA would shoot
the aircraft bringing in a coup
de main party to pieces. On the
other hand, the RAF pilot that
took the oblique photos of the
road and pontoon bridges just
days before the operation,
wasn't shot down and he flew
approximately the same route.
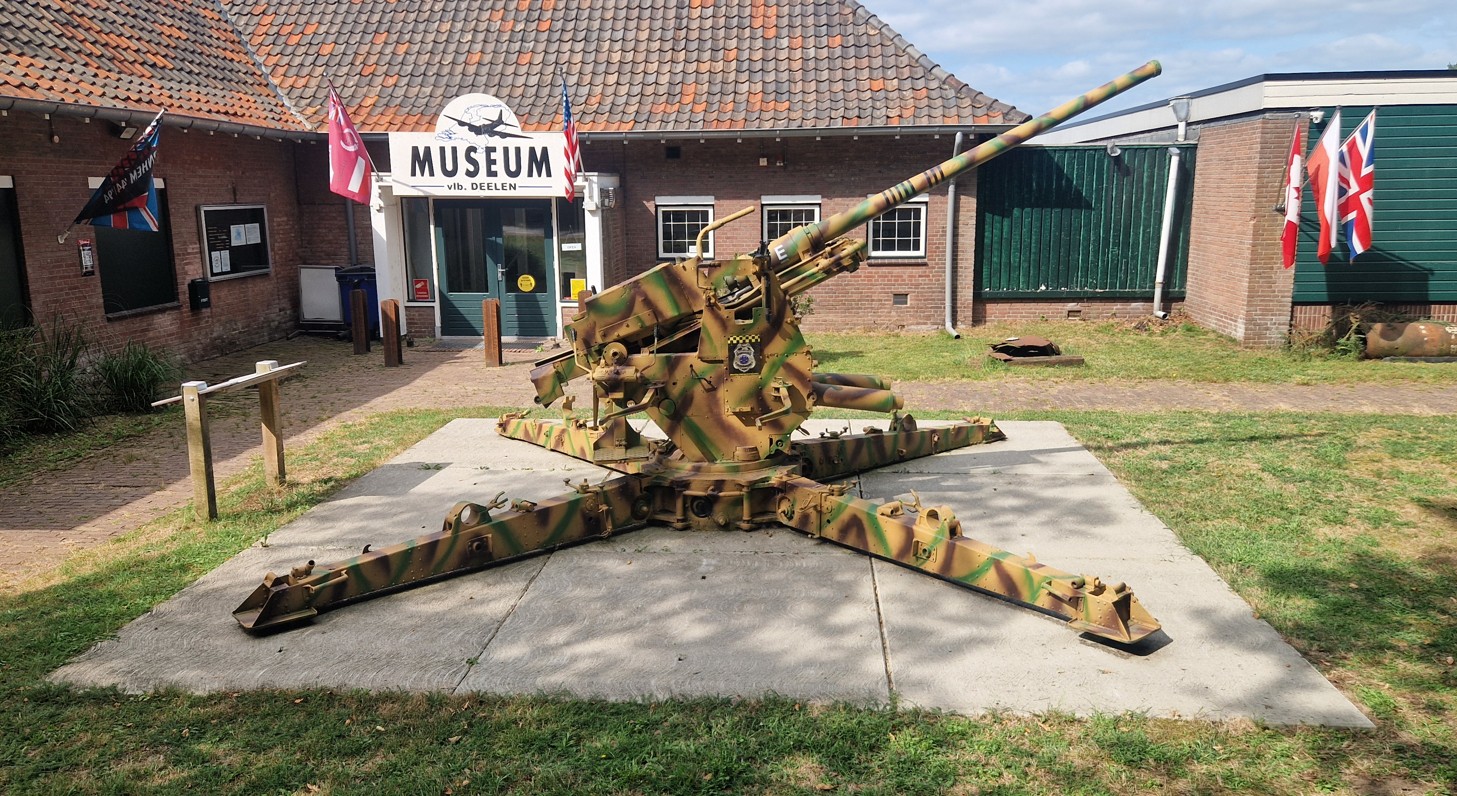
A truly tangible piece of
evidence for this factor is the
French 7.5 cm Flak M36 (f) gun
in front of the Deelen Museum.
It was part of those
AAA-positions and was dug up in
1996. Its crew consisted of very
young volunteers of the �Reichsarbeitsdienst�
(German State Labour Service).
They were assisted by POW�s from
Belarus who did the heavy work.
On day one of the Battle of
Arnhem, all commanding officers
of the artillery battery had
become casualties, and the canon
became unusable. One of the
recuperators (shock absorbers)
failed. Also, the crew�s
ammunition supply was down to
just smoke grenades and
armor-piercing shells which were
virtually unsuitable for either
the overcoming aircraft or the
advancing airborne troops
advancing from Oosterbeek to the
Rhine road bridge.
The crew,
therefore, decided to abandon
their artillery piece. A "Sprengkommando"
(German demolition squad)
subsequently disabled it. This
is still clearly visible: both
the demolished recuperator and
the holes in the breech block
rendered the gun inoperable.
The museum in Deelen has
located, salvaged, and restored
this canon after it had been
buried in the flood plains of
the Rhine River for 52 years.
Remarkably, after thorough
research, they even managed to
track down the original crew.
|
(click to enlarge)
_small.jpg)

Fig.: Captured French 7.5 cm
gun belonging to "gemischte
Flak-Abteilung 594".
First
picture photographed
on 25AUG2014, second on 17FEB2024 and third on
20AUG2025.
Note that in 2013 the
museum had painted the gun in
the German "Gelb-Gr�n-Rot"
camouflage scheme with "Emil" on
it as this was the name of this
particular gun in "1. Batterie".
When we found it in 2024 it
was painted in the early war
dark grey Wehrmacht color and in
2025 it was in "Gelb-Gr�n-Rot"
again with just the letter "E"
on the barrel as it was in 1944.
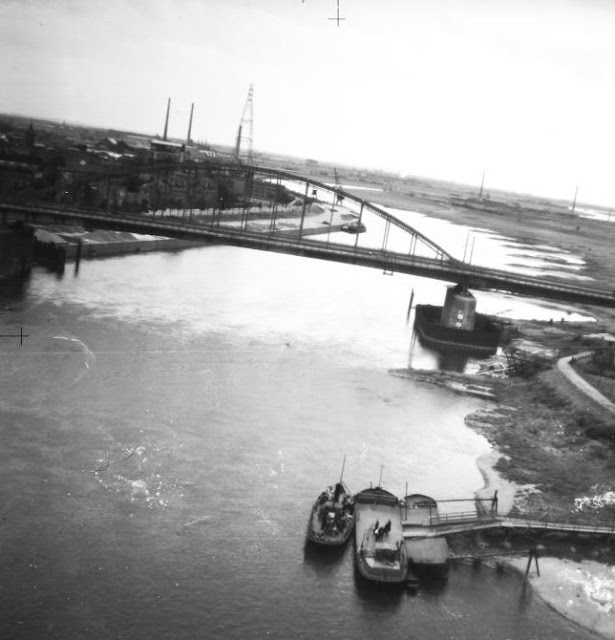
Fig.: Low-level oblique photo of
the Arnhem bridge
taken by
541 Squadron on 6SEP1944.
On
12SEP1944 RAF pilots also took
the photo shown below with the
pontoon bridge on it
and
again could do this unopposed by
AAA-fire. |
2) Diagrams comparisons of
LZ at Pegasus Bridge and
imaginary of a fictitious coup-de-main landing
at Arnhem Bridge. |
(click to enlarge)
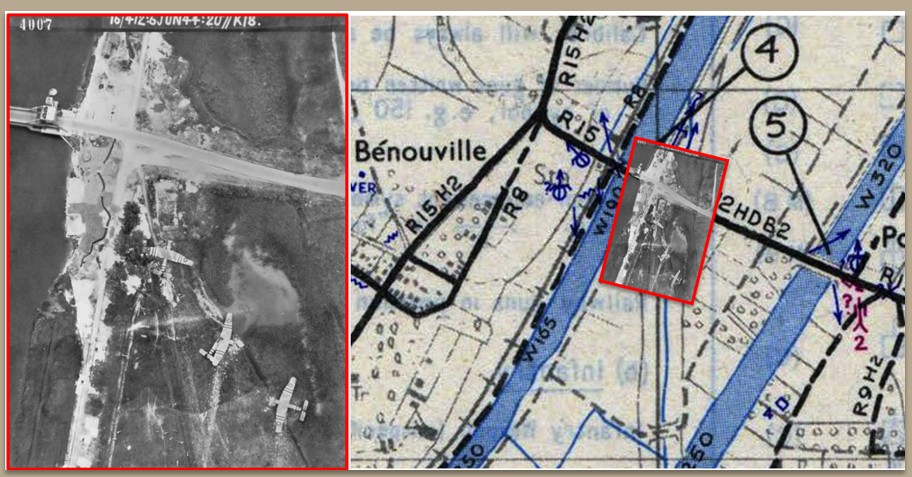
Fig.: Left: British Horsa
gliders landed near "Pegasus
Bridge" near Benouville in
Normany in the night of
5-6JUN1944
Right:
FABRICATED
image of what it would look like
if Horsa gliders had landed
south of Arnhem bridge on
17SEP1944 |
|
It is often said that
Operation �Market Garden� was
essentially an intelligence
failure.
British intelligence
officer Major Brian Urquhart,
not related to Major-General
Urquhart the commander of 1st
Airborne Division, warned about
the presence of the 2nd SS
Panzer Corps, but was ignored as
can be read in
Case File #19. It is however
a fact that the greater Arnhem
area was not infested with
German armor when the air
assault started.
|
Tangible Evidence of
Limited presence of German armor
in the Arnhem area on 17SEP1944:
1) From the NIOD archive in
Amsterdam: Messages from the
Dutch Underground sent shortly
before the start of Operation
�Market Garden� only indicate
the presence of the 9th
�SS-Panzer-Division
Hohenstaufen� in the area north
of Arnhem.

Fig.: Typed message either sent
from occupied Netherlands to
Londen via microfilm or in
encrypted Morse radio messages
informing: "IJssel
Line.14 September. Both
sides of IJssel river between
Zutphen and Arnhem and in
Achterhoek region SS. division
Hohenstaufen stop. Division
staff presumably in Doetinchem
stop other staff elements at
Beekbergen and Epse stop. Above
line Loenen-Zutphen are 1900 men
of this divison".
On this note,
it is a mystery to this agency
that the presence of 9th and
10th SS Panzer division came as
a surprise to the men of 1st
British Airborne division when
reference is made to at least
one panzer division in that Area
of Responsibility in the
Intelligence Summary of the 82nd
Airborne Division dated
11SEP1944. Was this intelligence
not available to the British and
if so; why not?
|
(click to enlarge)
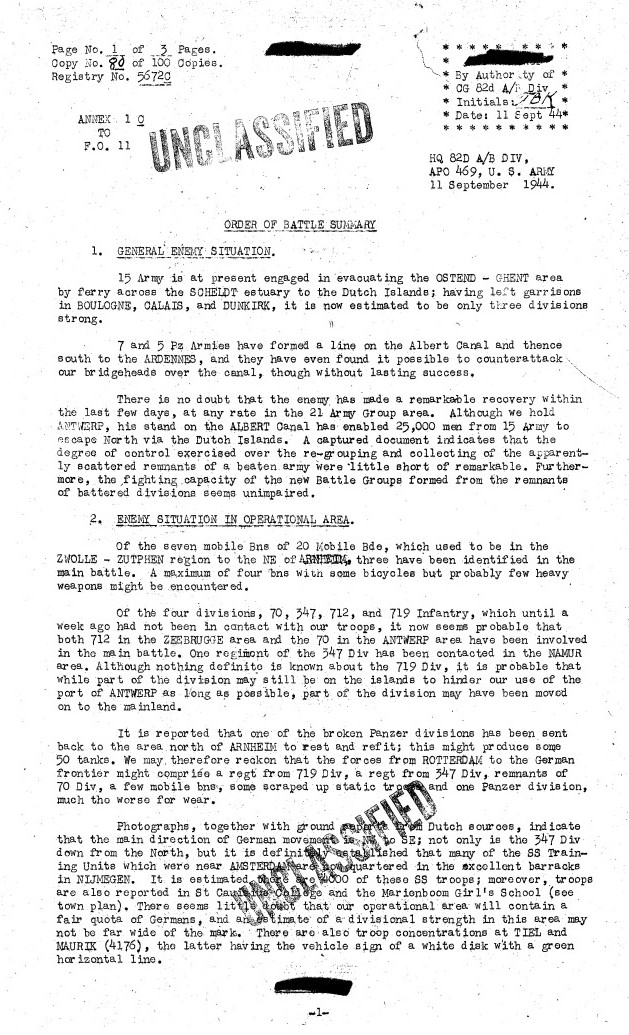
Fig.: Annex 1C to
Field Order 11 of the 82nd
Airborne Division describing in
an Order of Battle Summary the
Enemy Situation in the
Operational Area:
"It
is reported that one of the
broken Panzer divisions has been
sent back to the area north of
ARNHEIM to rest and refit ; this
might produce some 50 tanks. |
|
2) From the
National Archives in the
UK:ULTRA Intercepts relating to
ENIGMA messages about deployment
of 2nd SS Panzer Corps in Arnhem
area |
(click to enlarge)
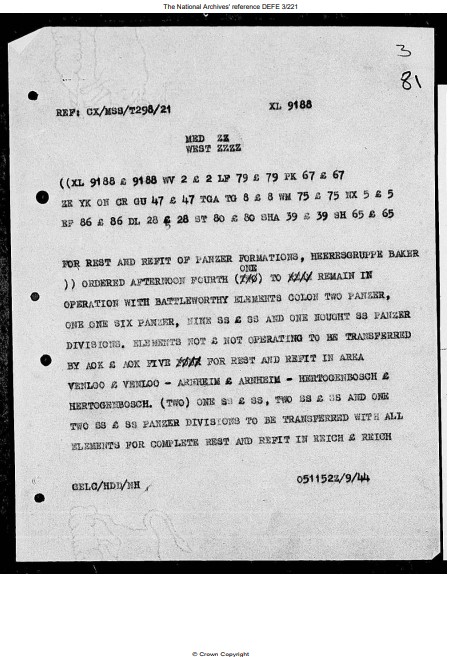
Fig.: Intercepted and
decyphered message of 05SEP1944
ordering 9th and 10th SS Panzer
Division to rest and refit in
Arnhem area. |
It was the German ability to
reinforce the units already in
the area that formed the
greatest threat.
The overall
plan was too fragile to
withstand the first opposition
met once the starting phase line
was crossed and airborne troops
started landing. It lacked the
flexibility to deal with the
inevitable setbacks such as the
ambush at the Dutch frontier and
the destruction of the
Wilhelmina Canal bridge at Son
both on the first day of the
operation. And, worse, to deal
with an active enemy who did not
react as Allied planners had
assumed.
|
Tangible Evidence of
Unpredicted enemy delaying
advance of "Garden":
|
|
The lead elements of XXX Corps
was confornted with enemy
resistance from the moment it
crossed the Netherlands
frontier. Well known are the
images of a burning British Loyd
carrier with the amuniton it was
transporting cooking off. This
was caused by a German Prisoner
of War who managed to throw a
hand grenade into the vehicle
killing the driver, SGT W.H.
Williams of the Irish Guards.
The POW was killed subsequently.
In the Commonwealth cemetery at
Lommel not far from the
incident, Sergeant Wiliams is
laid to rest. |
(click to enlarge)
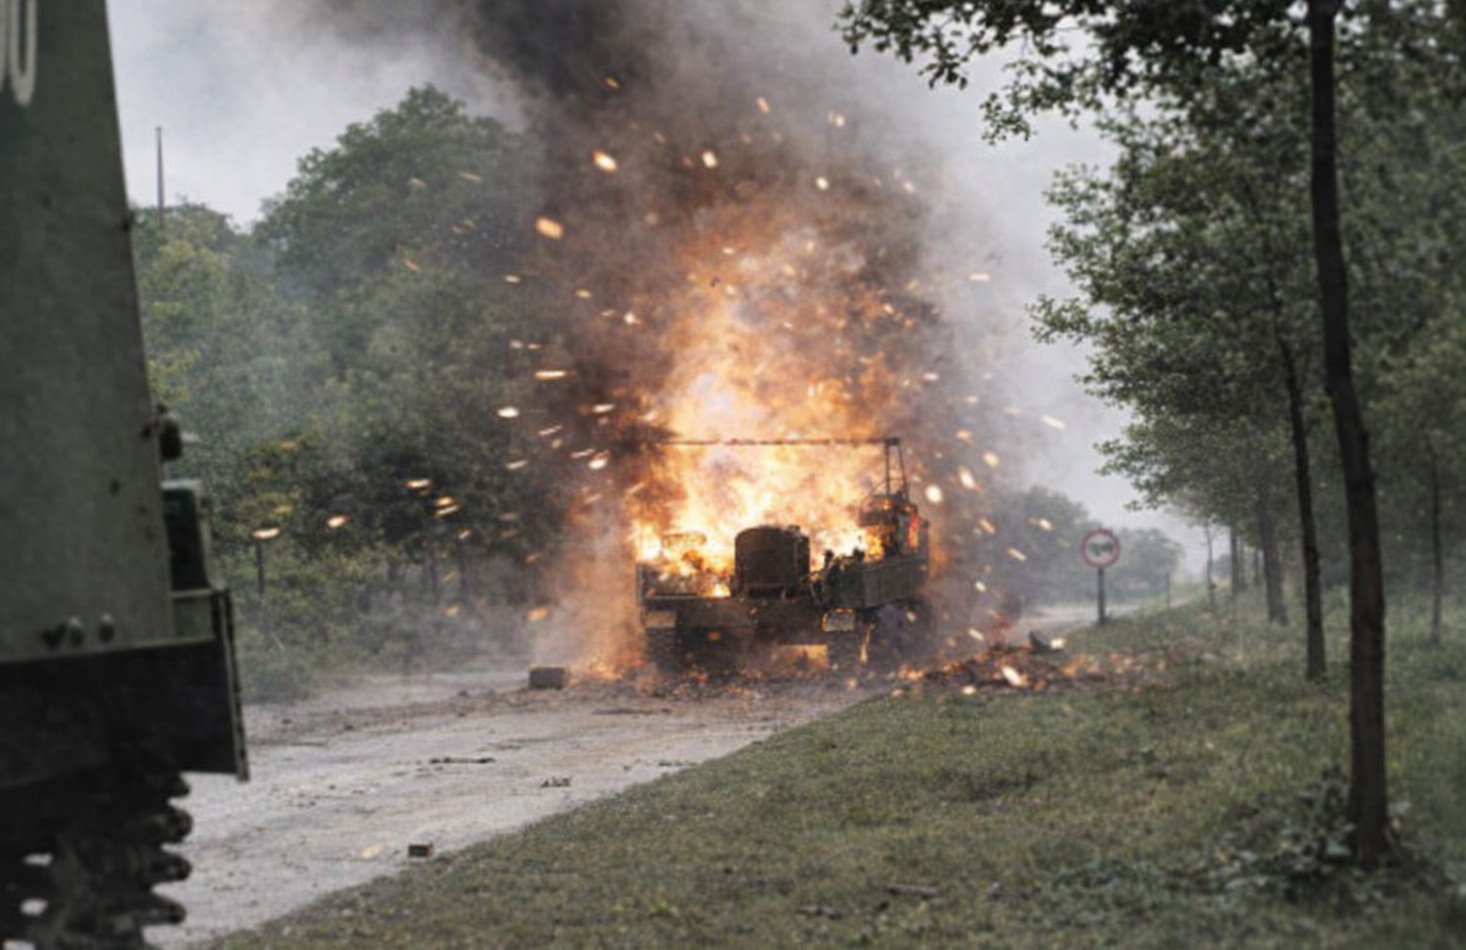

Fig.: Colorized image of the
Lloyd carrier of SGT Williams of
the Irish Guards
burning
near the Dutch border on
17SEP1944 and SGT 'Williams'
grave.
|
|
1) In situ: German ambush
positions along N69 south of
Valkenswaard |
(click to enlarge)
_small.jpg)
_small.jpg)
_small.jpg)
_small.jpg)
Fig.: Indentations in forest floor
along MSR (now Highway N69)
where German soldiers operating
anti-tank equipment laid in wait
for the lead elements of British
XXXth Corps on 17SEP1944.
.jpg)
Fig.: Lidar image of the
same forest floor today. |
|
2) In the
Wings of Liberation Museum in
Best: British vehicle parts
found along N69 south of
Valkenswaard. |
(click to enlarge)
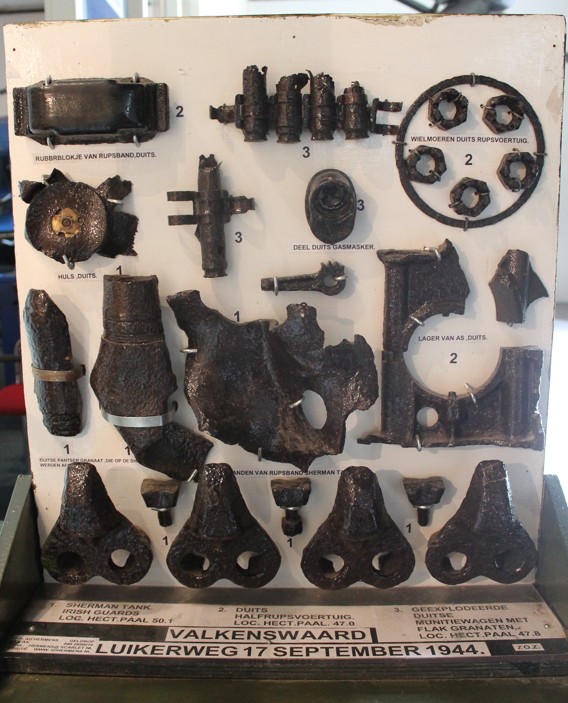
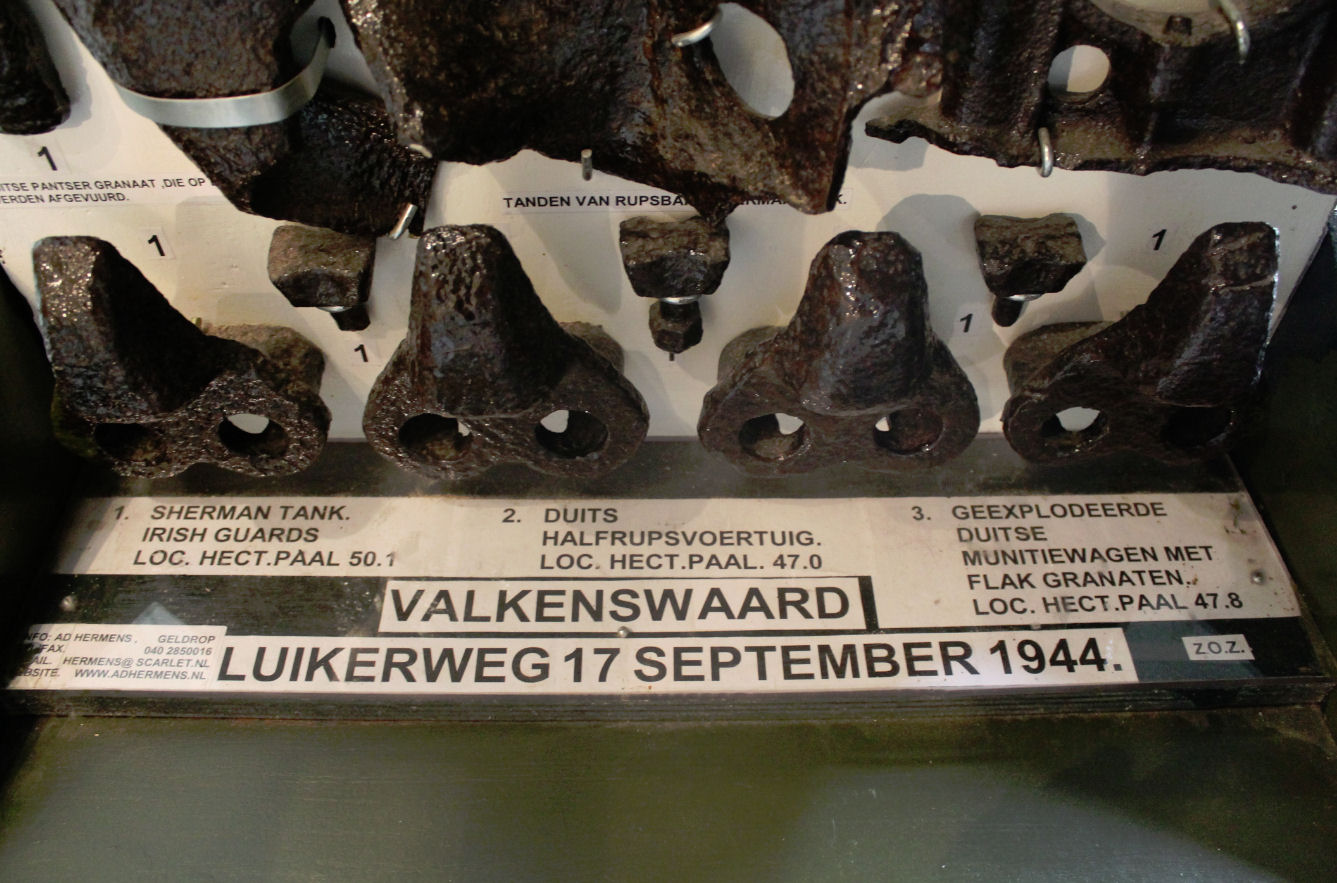
Fig.: Battlefield relics
donated to the
Wings of Liberation Museum in
Best, the Netherlands
marked where they were found
(proximity to hectometer
distance signposts). |
2. Errors in the
execution phase
Most
likely the largest of errors in
the prosecution of the operation
was the delayed capture of the
Waal river road bridge at
Nijmegen. The main effort of the
airborne troops was to capture
all bridges en route to Arnhem
with �thunderclap surprise�,
which absolutely meant top
priority immediately after
landing. Unfortunately the task
and prioritization of capturing
Nijmegen bridge was given and
discussed in verbal order; not
in writing.
It should be
noted here that the US 82nd
Airborne Division had received
an incorrect intelligence report
about large numbers of German
tanks hidden in the Reichswald
forest on the eastern flank of
the Division�s drop- and landing
zones. This was also the area
where First Allied Airborne
Corps commander General
Frederick �Boy� Browning planned
to establish his headquarters.
These factors resulted in
prioritizing the capture of the
Groesbeek Heights at the expense
of the immediate advance in
force into Nijmegen.
|
Tangible Evidence of
Questionable Command Decision:
Moving entire HQ 1st
Airborne Corps to field at
expense of transport
capabilities that could
otherwise have been deployed for
war fighting elements
1) In close proximity to the
LZ of 1 Airborne Corps HQ: monument with Horsa
Glider parts in Groesbeek
|
(click to enlarge)
_small.jpg)
_small.jpg)
_small.jpg)
_small.jpg)
_small.jpg)
Fig.: Monument othe corner
of 17 Septembers Straat
and Parachutisten Straat
in Groesbeek honoring the
landing of 1st Airborne Corps
Headquarters.
Note "V"-shaped
element made from landing gear
wheel suspension of one of the
Horsa gliders bringing in
General Browning's staff.
Also note bullet holes in the
tubing.
.jpg)
.jpg)
Fig.: Monument on
Koning Juliana Weg in Groesbeek
honoring General Browning's
Headquarters. |
Although XXXth Corps can be
accused of lacking a sense of
urgency in their advance on
18SEP1944 (D-Day+1), the bridge
they needed to cross (Nijmegen)
was still in enemy hands.
Their participation in capturing
that bridge had not been
pre-planned, and XXXth Corps had
to spend much of its offensive
power in support of the 101st
and 82nd Airborne Divisions.
|
Factor Weather
The original plan was that the
remainder of 1st Airborne
Division would land in the
second airborne lift no later
than 1000 in the morning of
18SEP1944 but cloudy conditions
prevented air assets from taking
off before midday. It was not
until between 1500 and 1600 that
they arrived over the drop- and
landing zones.
After
19SEP1944, 7 of the next 8 days
had poor weather and all air
operations were cancelled on 22
and 24SEP1944. This left the
101st and 82nd Airborne
Divisions without their
artillery for days and the
latter division without its
glider infantry regiment for 4
days. The British 1st Airborne
division had to do without its
4th Brigade until five days into
the operation.
|
Factor Armored Corps
Doctrine (strictly daylight
operations with infantry
support)
Armored
assaults in darkness are
difficult and the lead elements
of the Guards Armored Division
tanks had little infantry
support.
Above all, they were
restricted to that one elevated
highway. A continued charge past
Nijmegen might have pushed the
German defenders off balance;
but a swift and bloody repulse
appears the most likely end
state.
|
Factor Close Air Support
The contribution of the Allied
air component was at times
perfect. For all the undoubted
bravery of the transport crews,
there were problems in supplying
the trapped division at Arnhem,
and delivering tactical air
support. All too often,
especially at Arnhem, Allied
tactical airstrikes were
unavailable. Sometimes it was
the weather, though more often
it was the inability to run both
types of mission simultaneously
in such a small area. When the
Typhoons could get in, however,
they were devastating. More
close air support might have
compensated the slow advance of
XXXth Corps.
|
Tangible Evidence of The
deployment of Close Air Support:
Found in situ and in possession of this agency:
Two 20mm Hispano cannon casings
presumably from strafing runs by
Hawker Typhoons, found near
Commonwealth cemetery along N69
south of Valkenswaard by Battle
Detective Antoine in close
proximity to the German
anti-tank ambush location.
|
(click to enlarge)
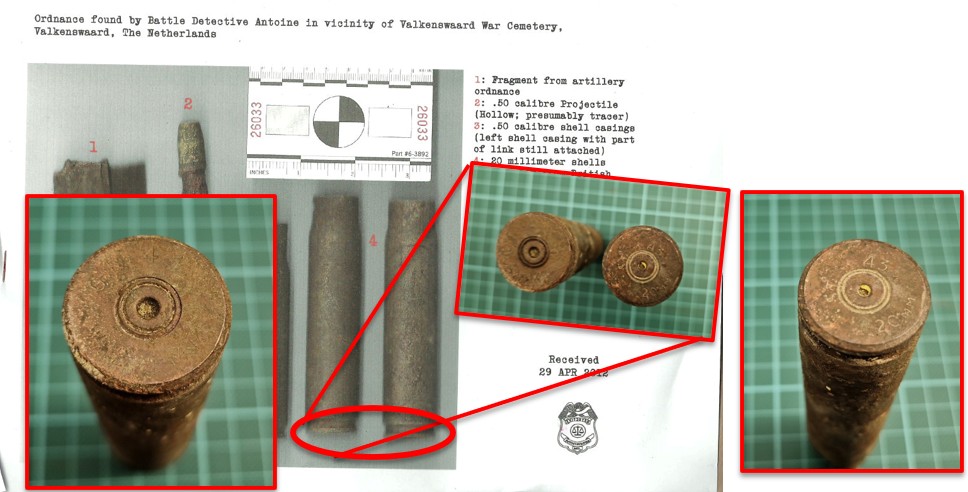
Fig.: 20 millimeter shell
casings found by Battle
Detective Antoine close to the
N69 South of Valkenswaard;
presumed to be from 20 mm
Hispano autocannons in British
Hawker Typhoons
providing
close air support on 17SEP1944. |
Factor Command and
Control
Commanding
Officer of the 1st British
Airborne Division, Major-
General Roy E. Urquhart, was
trapped in a townhouse on the
line of contact with the enemy
in Arnhem. He spent hours out of
touch with his own headquarters.
For the whole division, an
already complicated situation
was made far worse because of
this.
|
Tangible Evidence of
Command and Control Error
In situ: house on Zwarteweg 14 in Arnhem
where Major- General Roy E.
Urquhart was trapped in the
attic with sign �Urqhuart House� |
(click to enlarge)
.jpg)
.jpg)
Fig.: Townhouse on No. 14
Zwarteweg in Arnhem where
Major-General Roy E. Urquhart
and two other British
Airborne officers had been
hiding for hours on
17-18SEP1944.
Note sign
"Urquhart House". |
General Browning, supposedly
commanding all of the airborne
troops from his headquarters in
the woods near Groesbeek, proved
inept and out of reach.
Montgomery failed to control the
situation at all, while Horrocks
was probably too ill to be in
command.
Exemplary is
also the touristic battlefield
tour made by general Ridgway who
started his journey with General
Brereton. Both generals were stuck in Eindhoven
during the bombing raid on the
city 19SEP1944. They had to
abondon their staff car and
Brereton stayed in Eindhoven,
while Ridgway proceeded north
along Hell's Higway only to be a
nuisance for General Gavin in his HQ just when
the urgency of taking Nijmegen
Bridge became apparent.
|
(click to enlarge)
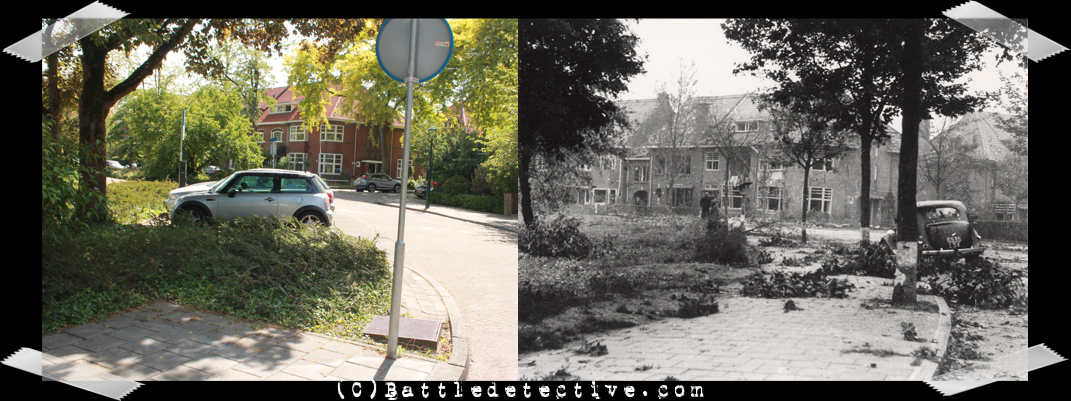
Fig.: Now&Then comparisson
of the corner of August Snieders
Laan in Eindhoven where General
Brereton's staff car was
abandoned and from where General
Ridgeway arranged for his own
transportation to the 82nd
Airborne Division's Area of
Responsibility.
|
On the opponent�s side we�ve
seen in �Kussin Junction� the
choice of Feldkommandant
Generalmajor der Infanterie
Friedrich Kussin to visit the
front-line troops of
SS-Haupsturmf�hrer Josef Krafft
which turned out to be a fatal
leadership decision.
|
.jpg) |
Nevertheless the ad hoc battle
command of Feldmarschal Model,
Generalkommissar f�r das
Sicherheitswesen Rauter and
SS-Oberst-Gruppenf�hrer Bittrich
took over operations, and
concurred.
|
Factor Signals
Communication
The
radios flown in to Arnhem were
mostly not up to the task and
failed repeatedly.
|
Factor
Wet Gap Crossing Capabilities
The problem of boats, bridging
materiel and river crossing
capabilities is often mentioned.
A look at the map shows that
this was likely to be a key
element of the operation. Surely
there were not enough boats and
amphibious vehicles, but these
were too slow and unsuitable for
a wet gap crossing under fire
anyway. This wasn�t an airborne
infantry task either.
|
Commander�s Intent:
Cross the Rhine from the current
position.
Many
publications state that the
intention of Operation "Market
Garden" was to by-pass the
Siegfried Line; known in German
as the Westwall (=
western bulwark). This was a
German defensive line built
starting in 1936, opposite the
French Maginot Line. It
stretched Kleve on the border
with the Netherlands, along the
western border of Nazi Germany,
to the town of Weil am Rhein on
the border with Switzerland. The
line featured more than 18,000
bunkers, tunnels and tank traps.
This agency is of the
opinion that the Operation�s
main effort was to cross the
Rhine starting from the current
position of the British Second
Army.
The intent of the
commander ordering the operation
(Field Marshal Bernard L.
Montgomery) is described in the
document "Operation
SIXTEEN (scrathed) "MARKET",
Outline Plan, INFORMATION" of
First Allied Airborne Army,
11SEP1944:
"2.
Own Troops
Guards
Armoured Division is across the
canal in the area HASSELT �
HECHTEL � BOURG LEOPOLD.
50
Division an s 11 Armoured
Division are fighting for
bridgeheads between Guards
Armoured Division and ANTWERP.
15 Division is reaching ANTWERP
today.
It is
the intention of the
Commander-in-Chief 21 Army Group
to advance NORTH across the
MAAS, WAAL and NEDER RIJN, form
a strong bridgehead NORTH of
ARNHEM and continue his
operation NORTH into HOLLAND and
EAST against the REICH. The main
axis of the advance is EINDHOVEN
� GRAVE � NIJMEGEN � ARNHEM.
INTENTION
3.
Airborne Corps will capture and
hold crossings over the canals
and rivers on Second Army�s main
axis of advance.�
This intention is in turn
repeated in the detailed orders
of the divisions comprising 1st
Airborne Corps; in this example
in Field Order No. 11 of the
82nd Airborne Division,
13SEP1944: |
(click to enlarge)
 |
�b. 21st Army Group now
along the ALBERT Canal, with
bridgehead at BEERINGEN will
advance N across the MAAS, WAAL,
and NEDER RIJN to form a strong
bridgehead N of ARNHEM and to
continue N into HOLLAND and E
against the REICH. The main axis
of adv is EINDHOVEN � GRAVE �
NIJMEGEN � ARNHEM.
A/B Corps
composed of 1st British A/B Div,
101st A/B Div and 82 A/B Div
will land in the area ARNHEM,
NIJMEGEN, UDEN and hold
strategic hwy crossings to
facilitate the adv of 21 Army
Group.�
|
No mention is made of the
Siegfried Line and the aim of
outflanking this fortification.
The intention starts with the
description of Second Army�s
position in an East to West
horizontal frontline more or
less parallel to the
Belgian-Dutch frontier. It is
therefor likely that the
intention of advancing north
onto Holland originates from a
desire to cross the main
Western-European rivers where
the opposition is expected to be
less lethal than in the Reich
itself.
A pivotal maneuver of
the Second Army in Eastern
direction and straight across
the Rhine river through the
Eiffel Forest would likely prove
deadly for the attackers.
One a side note, the intention
fails to mention how the
commander foresees the crossing
of the last river after forming
"a strong bridgehead N of
ARNHEM and to continue N into
HOLLAND and E against the REICH";
that is the river IJssel.
It
can be ruled out that the axis
of advance as planned, was
designed to by-pass the
Siegfried Line as it is not
mentioned in the order but stems
from the 2nd Army�s pre-mission
position at the intended start
line.
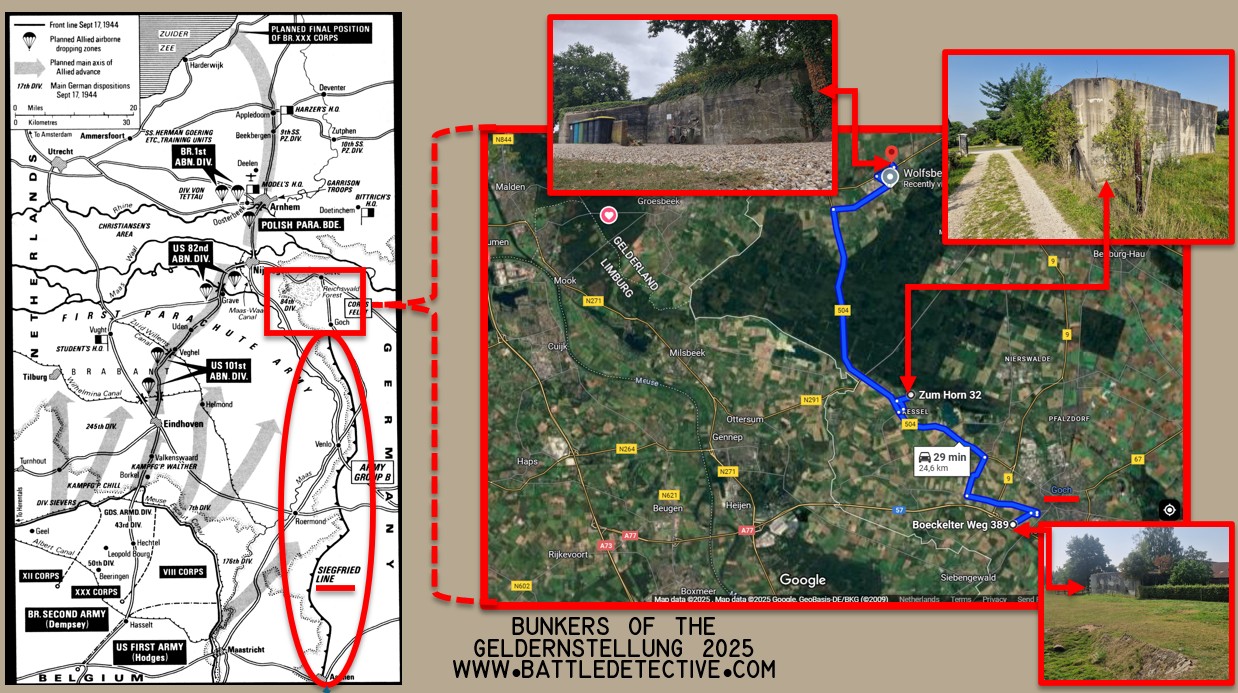
Moreover it is the
opinion of this agency that the
presence of the Siegfried Line
should not have been a factor
anyway in deciding to advance
into Holland and subsequently
East into Germany. The Siegfried
Line and its Northern section,
the "Geldernstellung" were
obsolete by the Fall of 1944 and
as a defensive feature would not
have stopped the advance of the
Second Army. Today several
concrete pillboxes and casemates
of the Geldernstellung can be
found east of the Area of
Operations of "Market Garden":
|
(click to enlarge)
 |
Tangible Evidence of The
Challenges of advancing on a
single MSR with multiple wet gap
crossings:
The route
of advance north of the ground
troops featured numerous
waterways to cross. Two wet gaps
along Hell's Highway turned out
to be delaying obstacles: the
canal bridge at Son destroyed by
the enemy on D-Day of the
operation and the river bridge
at Nijmegen that had yet to be
captured when the ground troops
reached the city on D+3. And
then of course the river bridge
at Arnhem of which the northern
ramp was captured by airborne
elements on D-Day to D+3 but
never reached by the grounds
elements of XXXth Corps.
These waterways still exist and
haven't changed significantly
since "Market Garden".
1) in
situ: photo
series of RNLA constructing
Bailey Bridge across Wilhelmina
Canal at Son on17SEP2014.
|
(click for enlargements)
_small.jpg) _small.jpg) _small.jpg) _small.jpg)
 _small.jpg) _small.jpg) _small.jpg) |
|
2) in situ: photo series of Waal
River Crossing reenactment 19-20-21SEP2024. |
(click for enlargements)
_small.jpeg)
_small.jpg)
_small.jpg)
_small.jpg)
_small.jpg)
_small.jpg)
|
3) In situ: (Neder) Rhine river
at Arnhem. A river that runs
from Switzerland to the North
Sea. During the withdrawal in
the night of 25-26SEP1944, many
British paratroopers swam away
from the Oosterbeek perimeter to
the southern banks. Although we did swim
the river Rhine on 19JUL2024
(from the Swiss bank at
Rheinauerweg 1 in 8447
Dachsen, to the German side and
back, there where the river is
wide but with strong currents),
swinging the same river at
Arnhem and Oosterbeek is not
only dangerous as signs by the
river tell, it is also illegal.
If caught swimming in the
river's fairway one can be fined
EUR 170,- (rate of 2025) by the
Dutch Department of Waterways
and Public Works ("Rijkswaterstaat").
And this is not without a
reason. Although the river is
narrower and the current seems
slower than the river Waal at
Nijmegen, the Rhine can be
treacherous and has claimed the
lives of swimmers in the past.
Also today it is easy to tell
that the loss of the existing
river bridges would cause
challenges for the attackers as
a Bailey bridge of the size as
the one in Son would not be
enough to cross this obstacle. |
(click for enlargements)
_small.jpg)
_small.jpg)
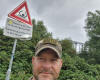
Fig.: Rhine river bank at Arnhem
with warning sign and poster:
Swimming the Rhine here is
dangerous and illegal.
_small.jpg)
_small.jpg)
Fig.: The river Rhine at Dachsen
in Switzerland which we crossed
by swimming in 2024.
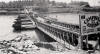
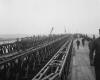
Fig.: left to right: first
Bailey Bridge named "Campbell
Bridge" at the site of the
pontoon bridge in 1945,
that
same year a double Bailey bridge
named "Foulkes and Simonds" was
constructed east of the river
road bridge,
in 1946 a more
permanent Bailey bridge was
finished until the original
bridge was reconstructed in
1950.
|
4) In situ: The pontoon bridge
across the river Rhine at
Arnhem, which had become
obsolete with the completion of
the road bridge in 1935, was an
objective of the paratroopers
who were also tasked with taking
the latter river crossing. On
17SEP1944 the paratroopers of
LT-COL John Frost found the
center section of the bridge on
the southern river bank and left
the bridge behind.
In a
"What-If-"scenario one can
discuss what tactical advantages
the intact pontoon bridge would
have provided the British
airborne soldiers. They might
have been able to put troops on
the southern bank and attack the
road bridge from both sides. |
(click for enlargements)
_small.jpg)
_small.jpg)
_small.jpg)
Fig.: Pontoon "GWA 14"
for Municipal Works Arnhem No.
14,
which was found in
derelict state in 2007 was
restored
and sits on the
spot where the south end of the
pontoon bridge was.
.jpg)
.jpg)
Fig.: Left: On an oblique aireal
photo taken on 12SEP1944 the
center section of the pontoon
bridge
can be seen dragged
mid-river and away from bridge.
Right: On a vertical
aireal photo taken during the
battle (not smoke above the
town),
the center section
can be seen neatly "parked" on
the southern bank. |
3. Error in
Understanding of Opponent�s
strength
During the
entire operation, the German
defense was highly competent and
capable of frustrating the
Allied plans. German units
remained tactically sharp. The
immediate response to the
initial Allied airborne assault
showed a high degree of
initiative on local levels. The
troops were well led and, even
against elite paratroops, they
held their own. This bought the
Germans precious time and
allowed for defensive positions
to consolidate, particularly in
Arnhem.
The German
situational understanding,
planning, organization, and
decision-making were exemplary
at the operational level.
Especially Feldmarschall Walter
Model of Army Group B and
SS-Obergruppenf�hrer Wilhelm
Bittrich commanding the 2nd SS
Panzer Corps, quickly understood
the situation and reacted
accordingly. Deploying the
troops they had, Kampfgruppen
were formed and counter-attacks
were already threatening the
Allied offensive within 24
hours. This performance makes
that of Horrocks and Browning
look uninspiring.
|
Factor Operational
Security
On
15SEP1944 the alleged betrayal
by Dutch double agent Christiaan
�King Kong� Lindemans of an
imminent combined arms assault
into southern Holland took
place. Tasked by Allied command
to cross the lines into occupied
Holland to inform resistance
groups of the imminent
operation, King Kong first went
to the Generaloberst Kurt
Student, in charge of the German
defense of occupied Holland.
There he told of a planned
armored assault in the direction
of Eindhoven. Student had King
Kong transferred to the Abwehr
(Counterintelligence)
headquarters in Driebergen to be
debriefed indepth. King Kongs
double cross betrayal can at
least be viewed as another
confirmation of what the Germans
were already expecting:
|
(click to enlarge)

Fig.: From the OB West
Tagesmeldebuch 11SEP1944
"Reliable source says invasion
is imminent and all precautions
are taken in Holland" |
Tangible Evidence for the
Betrayal of the operation by
Double Agent Christiaan �King
Kong� Lindemans:
1) In situ:
Photos of Lindemans� grave in
Crooswijk.
|
(click to enlarge)
.jpg)
.jpg)
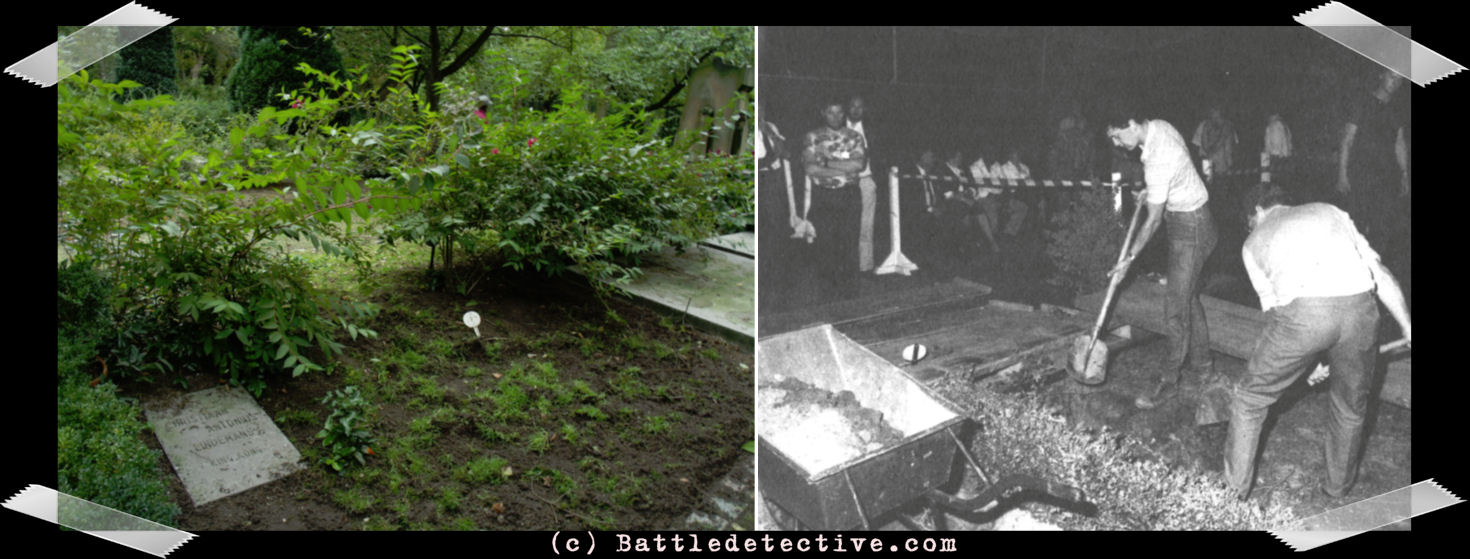
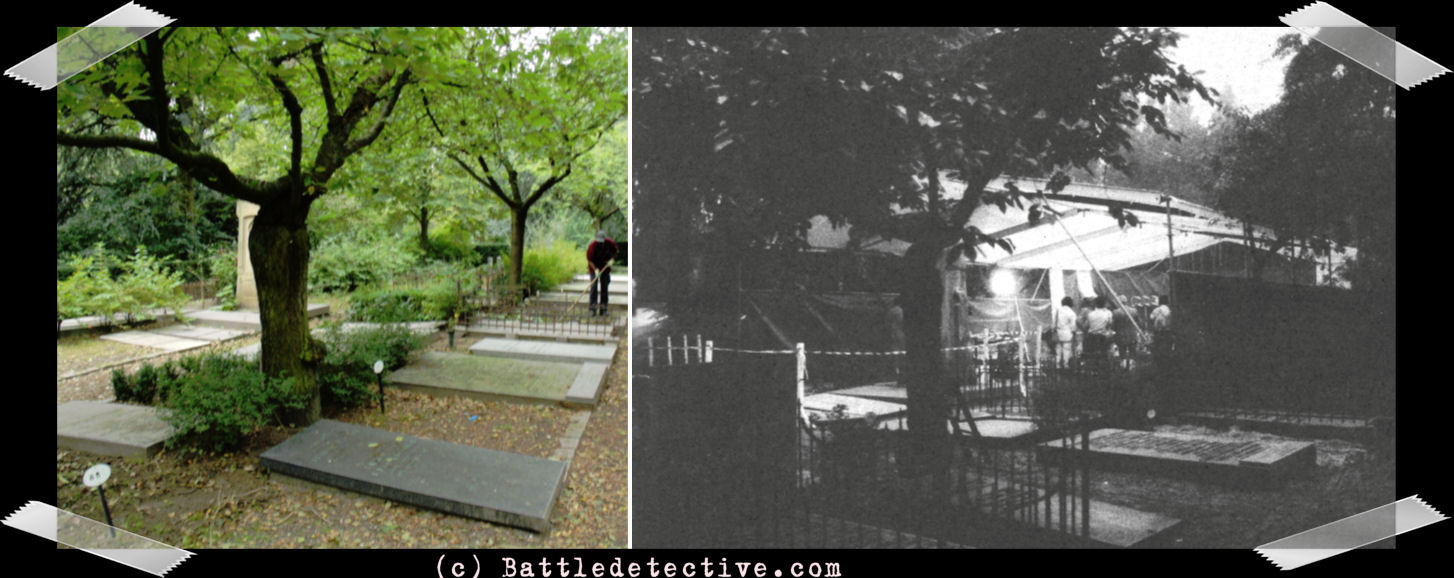
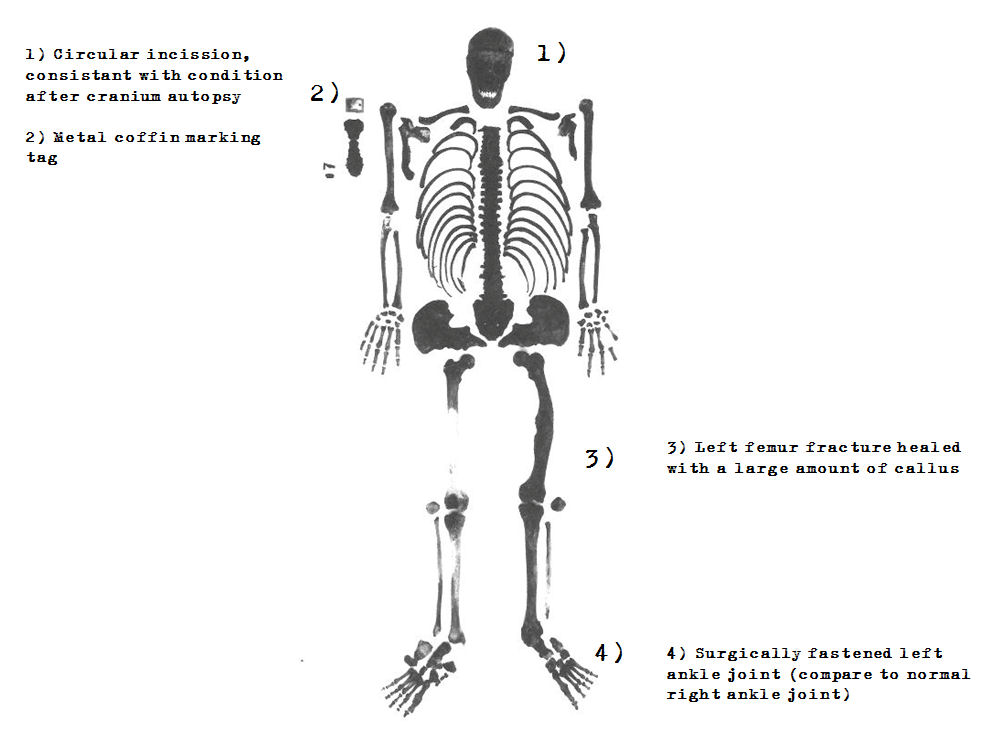
Fig.: Christiaan "King Kong"
Lindemans' grave today and
exhumation of his remains on
17JUN1986.
After examination
it was determined that the
exhumed remains could indeed be
identified as those of
Lindemans, that anatomically no
cause of death could be
identified from the skeleton,
and that there were insufficient
arguments to demonstrate arsenic
poisoning. Everything seemed to
indicate that Lindemans had
indeed committed suicide. |
|
2) In the NIMH
Archives in The Hague: King
Kong�s handwritten statement in
French of NOV1944. |
(click to enlarge)
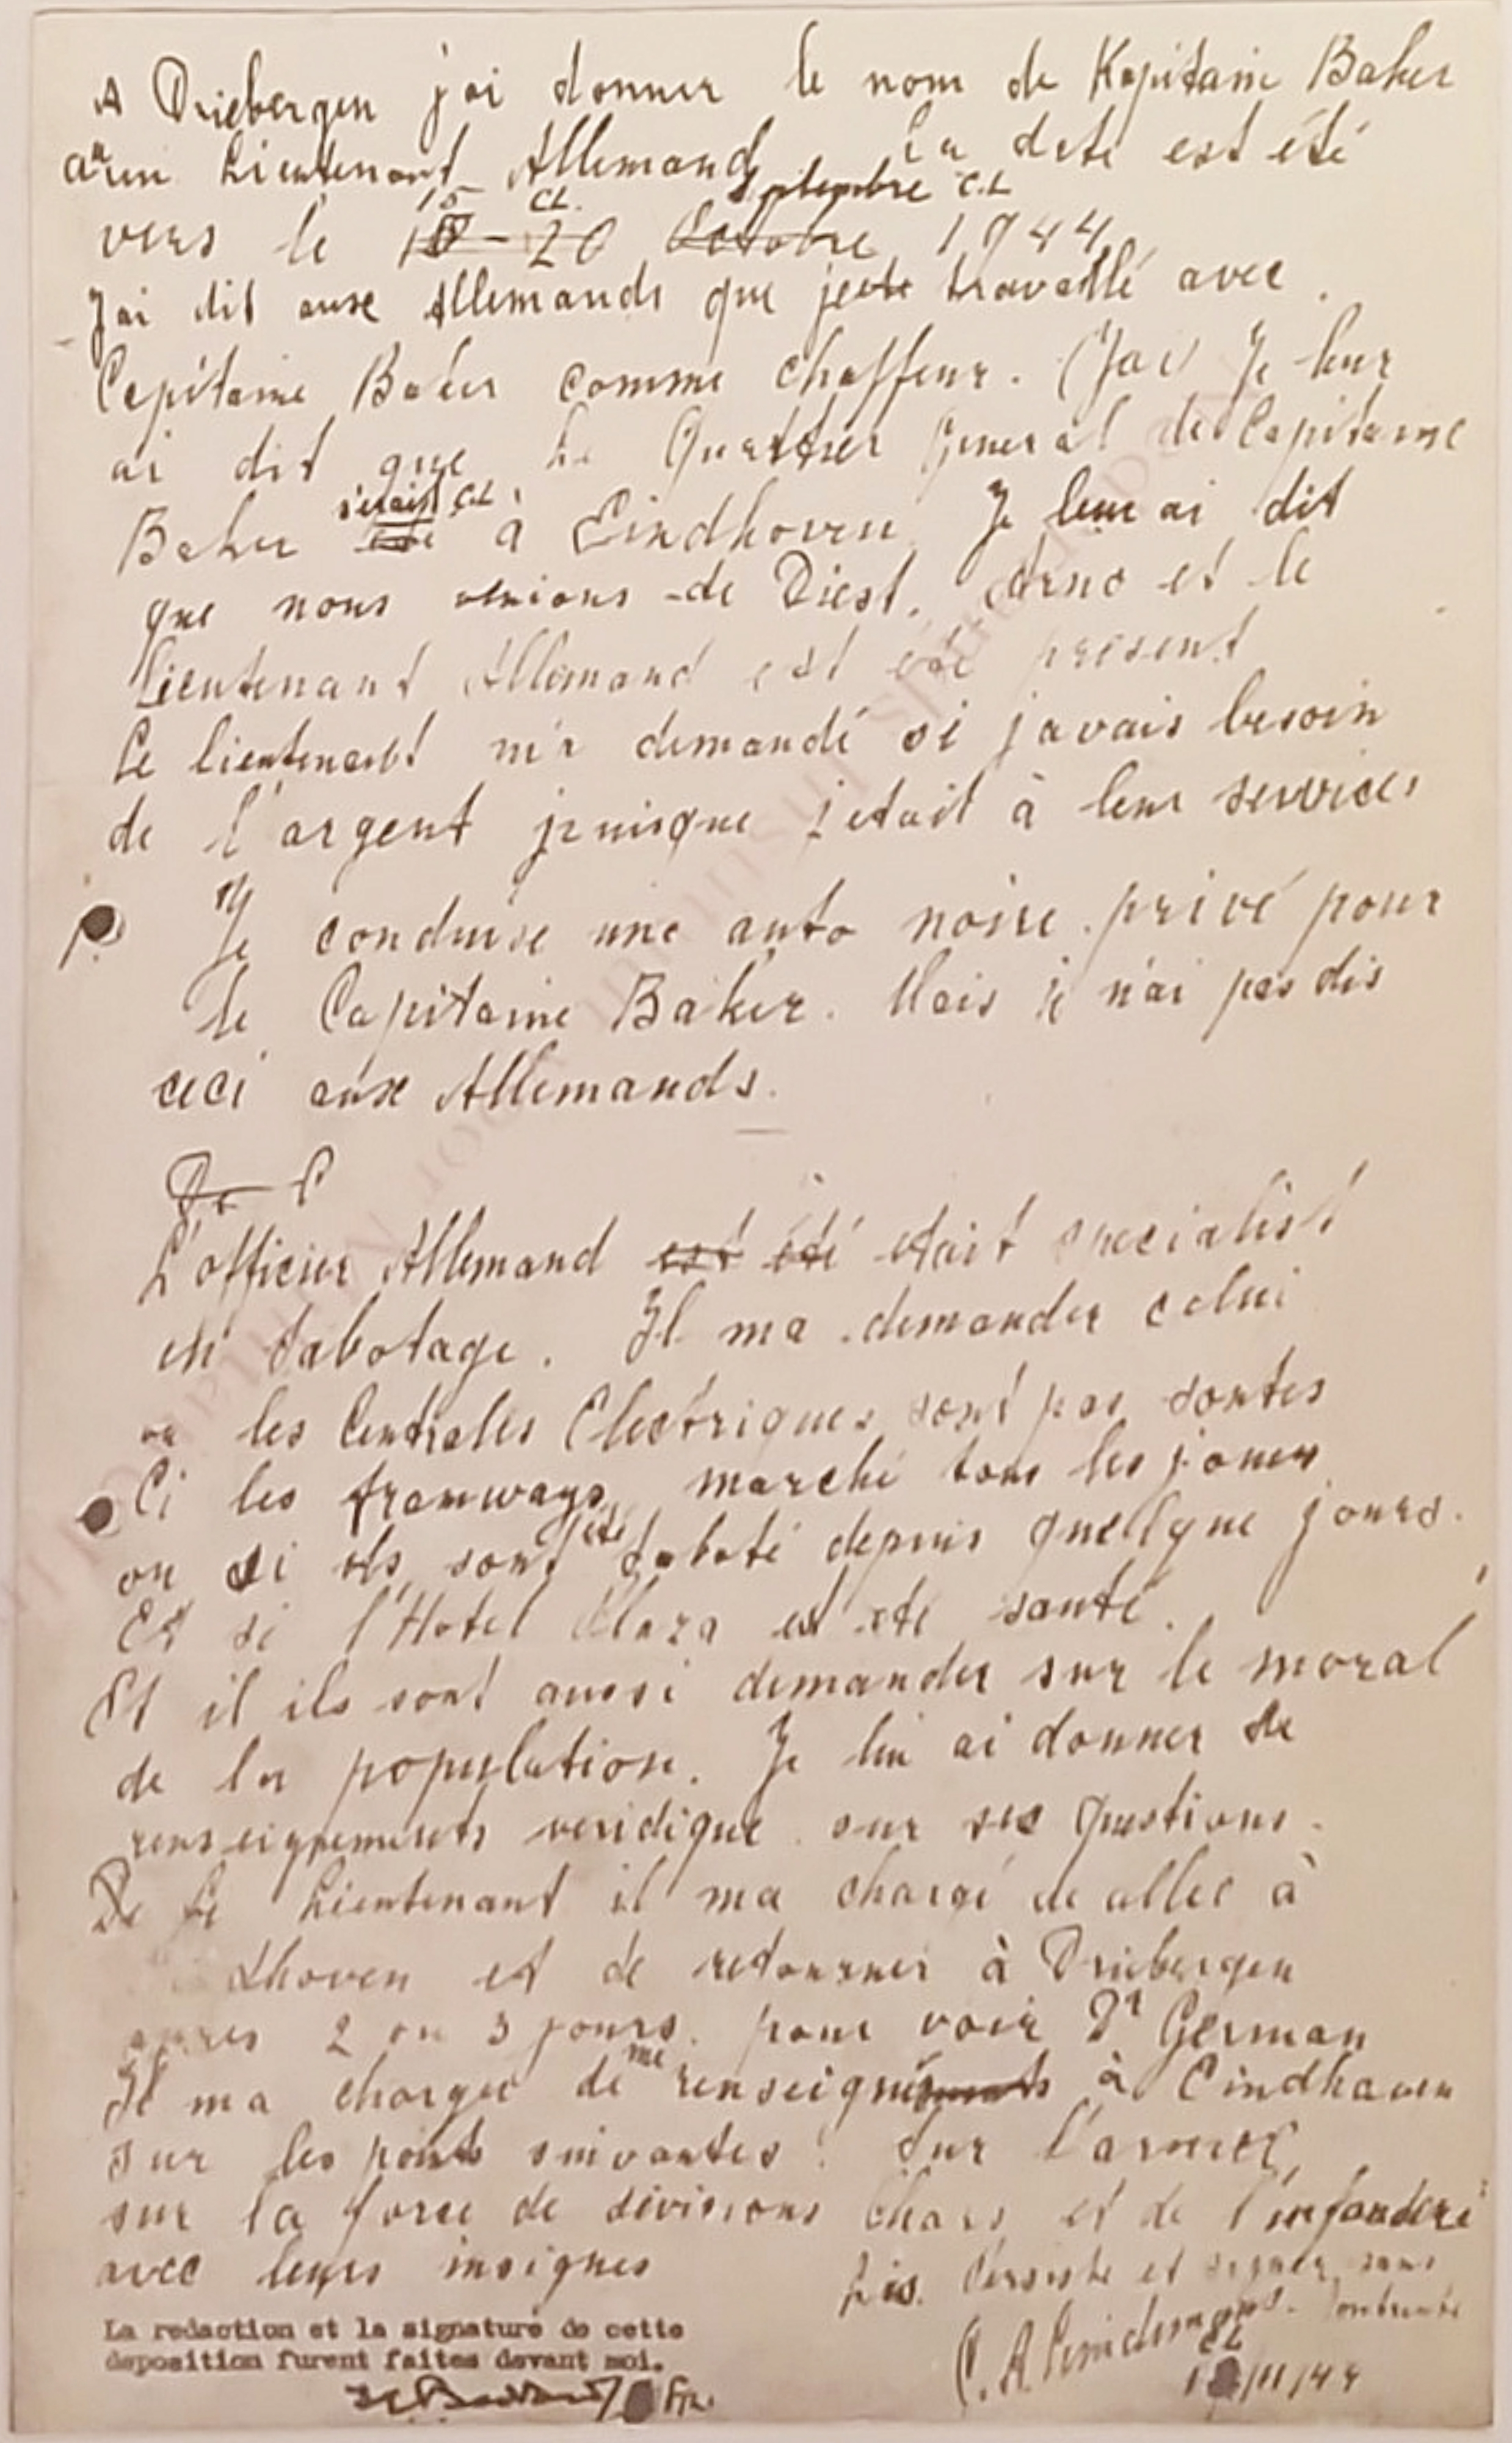 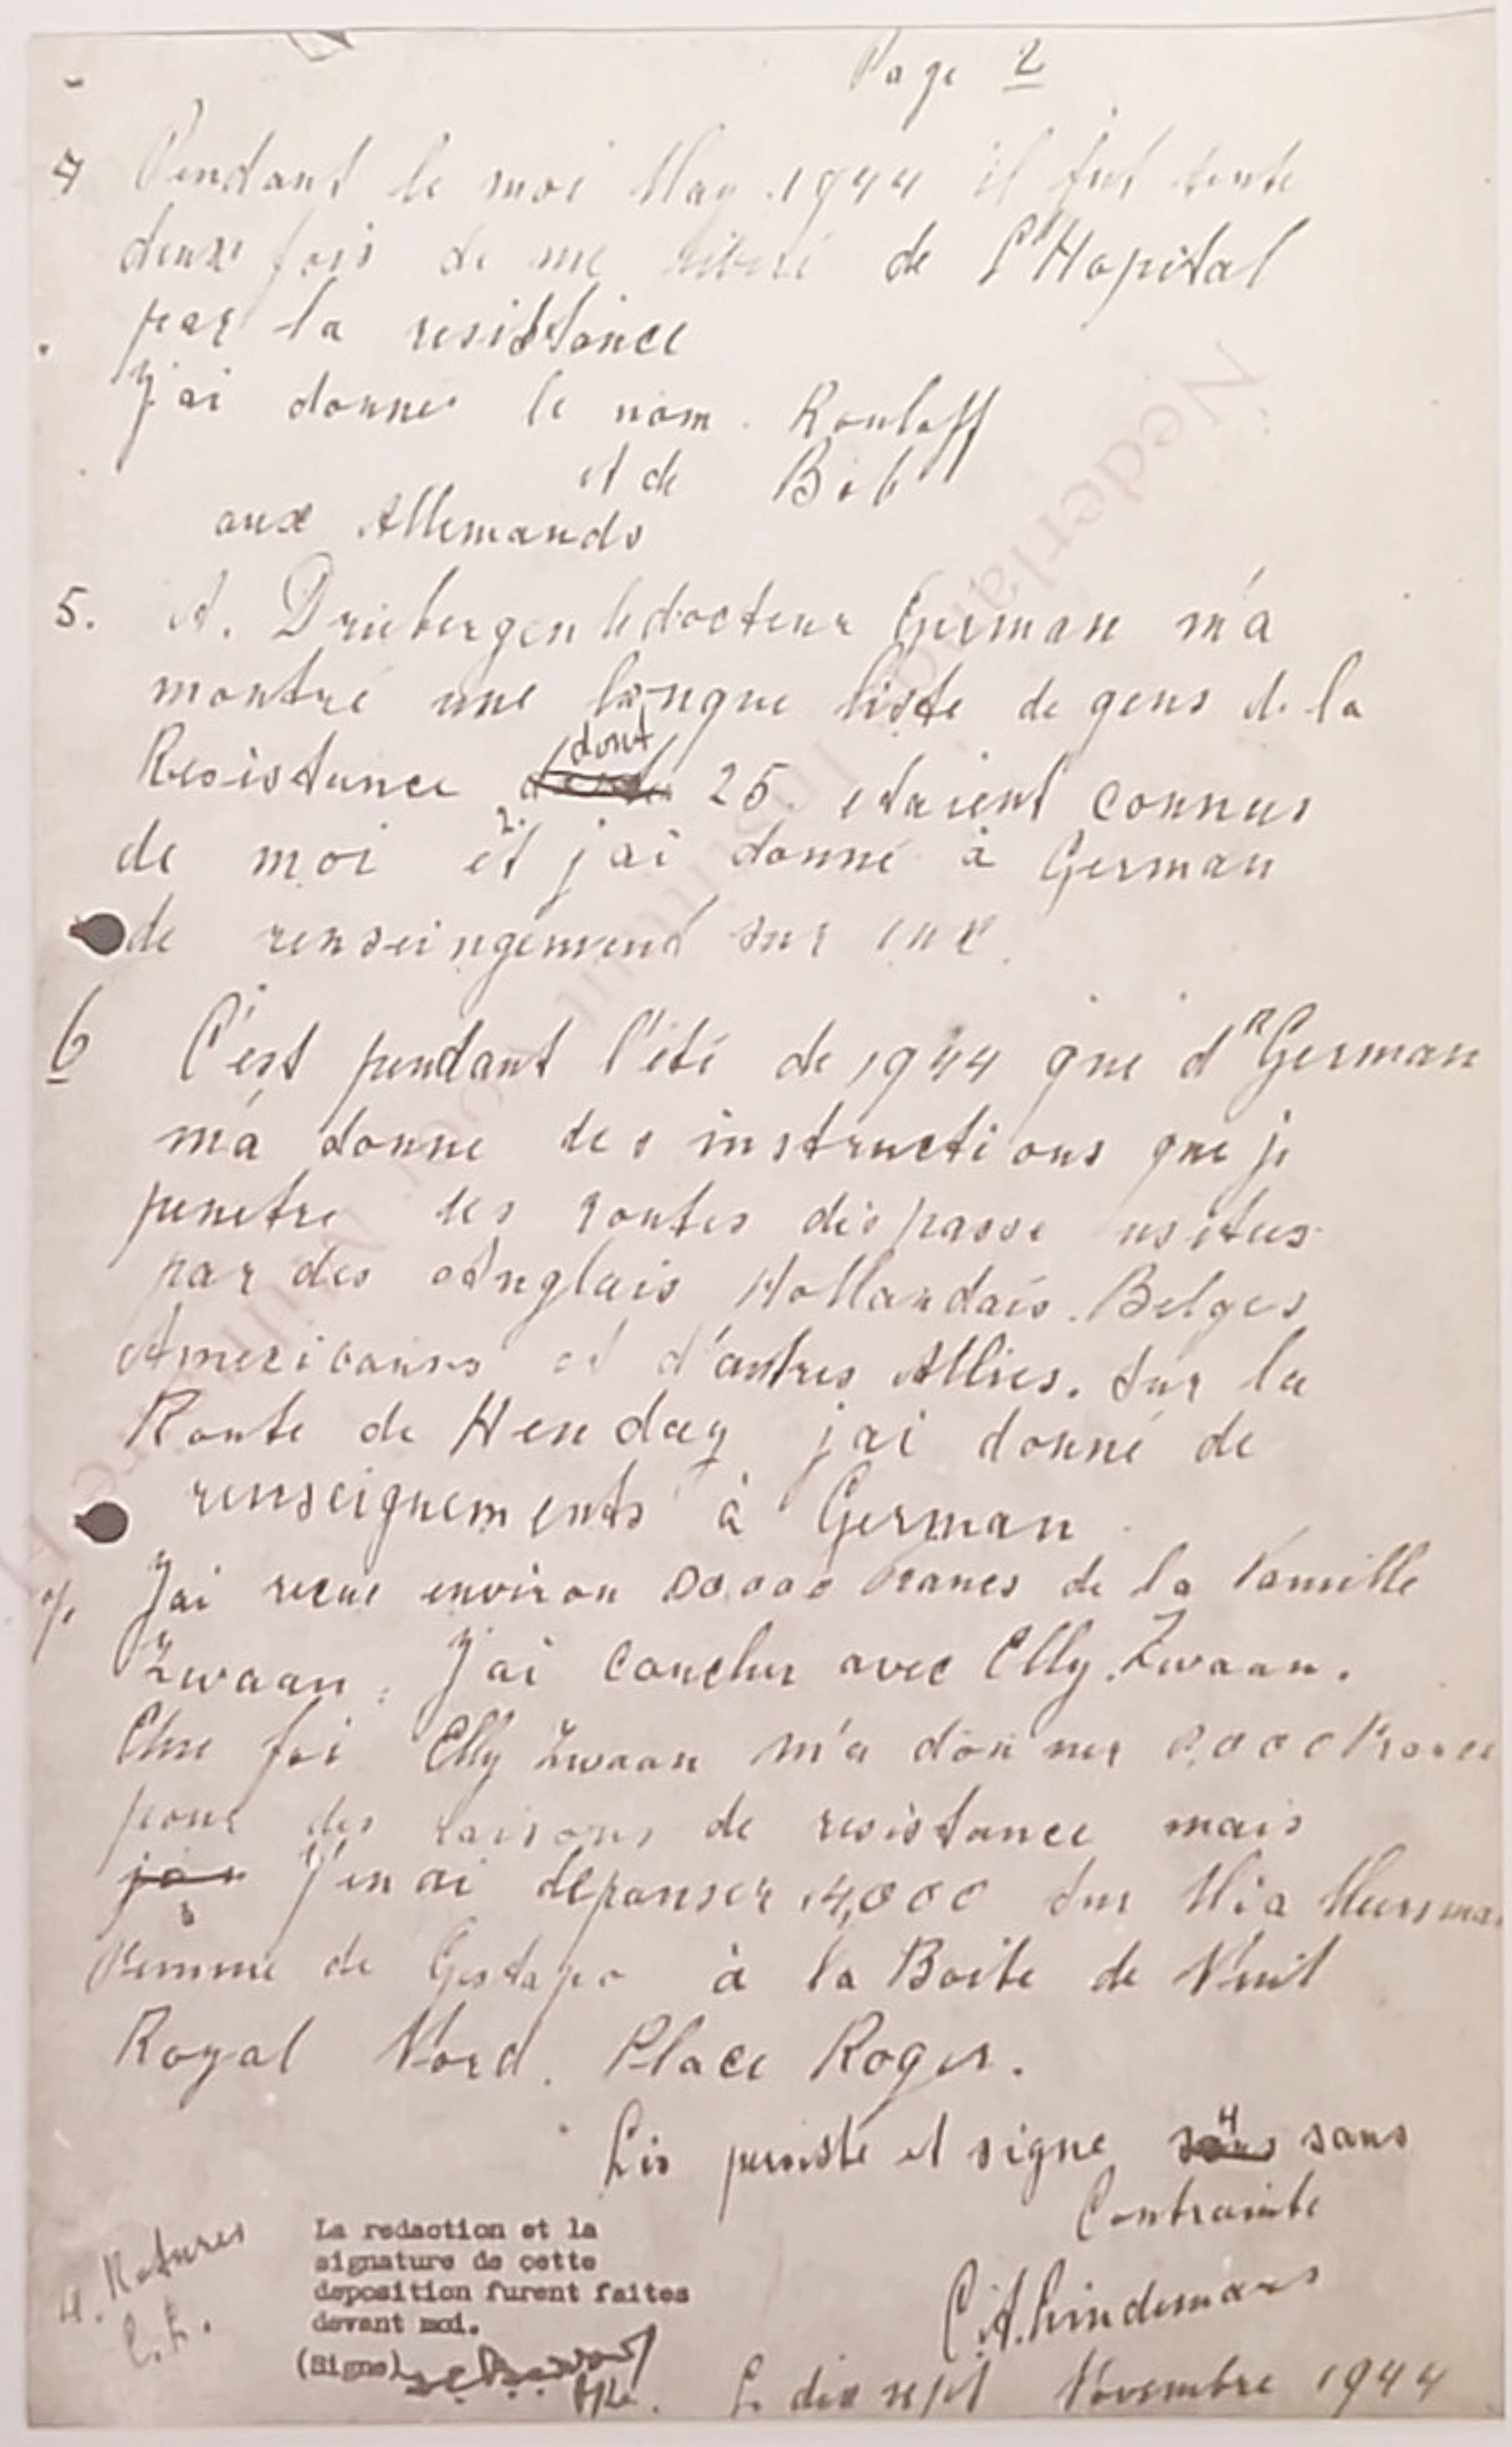
Fig.: Two pages in
Christiaan "King Kong"
Lindemans' own handwriting in
which he only admits to Canadian
Field Security that in
Driebergen he betrayed his
handler Captain Baker and the
resistance network he was a
member of; nothing about
divulging military intelligence. |
|
3) In
Boerre�s book: German report
with intelligence from a
�V-Mann� which can only be King
Kong. |
(click to enlarge)
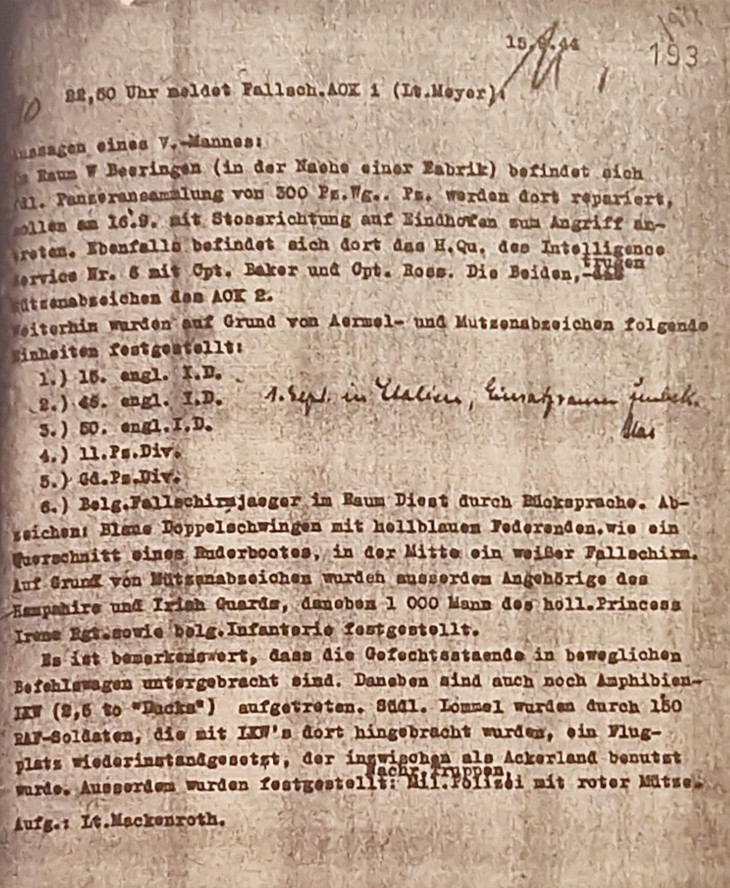
Fig.: Report in German:
9/15/44
At 10.50 p.m.
Fallsch.AOK 1 (Lt. Meyer)
reported:
Statements from an
undercover agent:
Located in
area W Beeringen (near a
factory).
Enemy tank
gathering of 300 armored
vehicles. Tnks are repaired
there, should start attack
thrusting towards Eindhofen
September 16th. The H.Q. of
Intelligence Services No. 6 with
Cpt. Baker and Cpt Ross is also
located there. Both wore cap
badge of the 2nd Army.
Furthermore, based on sleeve and
cap badges, the following units
were identified:
1) 15th
English I.D.
2) 45th English
I.D.
[handwritten:
�September 1st in Italy,
operational area unknown
(illegible)]
3) 50th English
I.D.
4) 11th Arm. Div.
5)
Grenadier Arm. Div.
6)
Belgian paratroopers in the
Diest area by consultation.
Insignia: Blue double wings with
light blue feather ends, like a
cross section of a rowing boat
with a white parachute in the
middle.
Based on cap badges,
members of the Hampshire and
Irish Guards, alongside 1,000
men of the Royal Princess Irene
Regt. and Belgian Infantry
identified.
It is noteworthy
that the command posts are
accommodated in mobile command
vehicles.
In addition, there
also amphibian trucks (2.5 to
�Ducks�) are deployed. South of
Lommel an airfield, that in the
meantime was used for farmland,
is repaired by 150 RAF soldiers
who were brought there in
trucks, an aircraft.
Also
noted were: Signals Troops, Mil.
Police with red cap.
Signed:
Lt. Mackenroth
|
4) In File KV-2-231 in
British National Archives:
Transcript of German
Intelligence message intercepted
by Bletchley Park dated
22AUG1944 of King Kong already
relaying intended Airborne
Assault towards Maas. |
(click to enlarge)
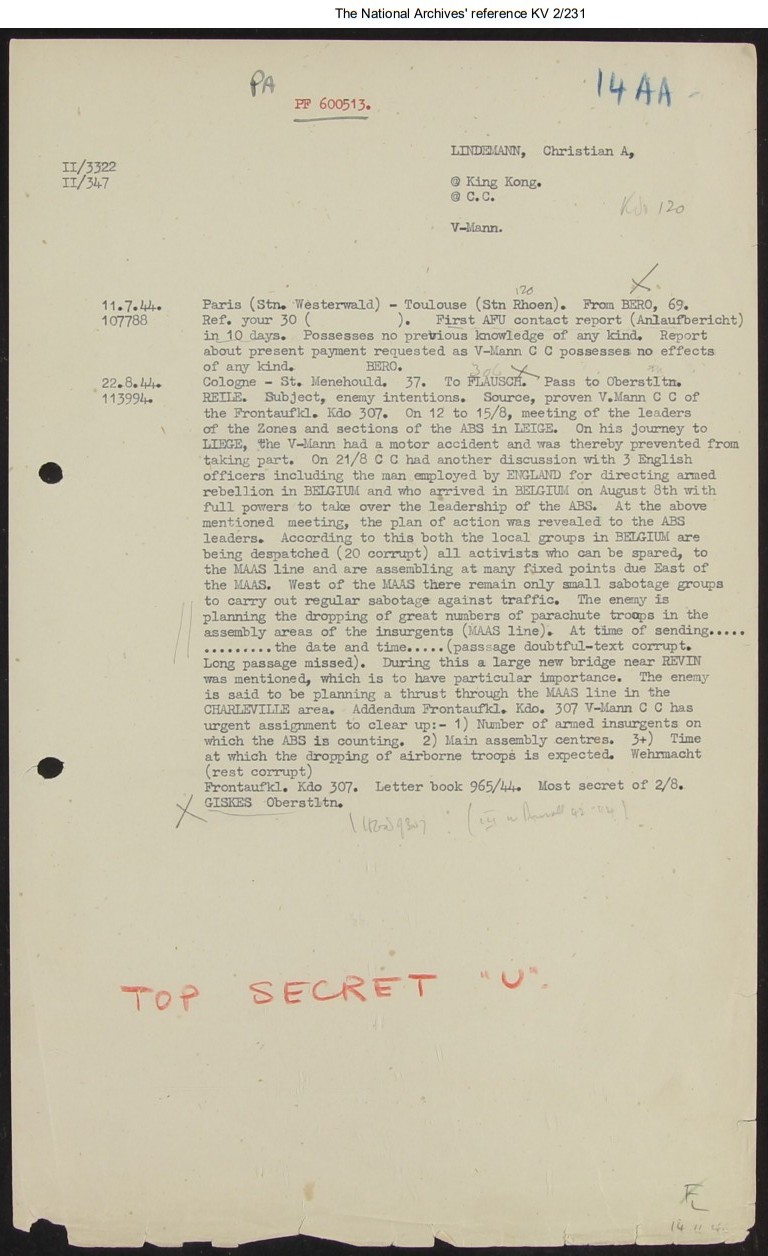
Fig.: Intercepted and
decyphered message of 22AUG1944
|
|
5) In
situ: Photo building in
Driebergen. |
(click to enlarge)
.JPG)
Fig.: Villa Heijdesteijn in
Driebergen where the German
Frontabwehrtrupp 365 (Front
Intelligence Troop) was
stationed and where Lindemans
provided the Germans with
intelligence described in the
15SEP1944 report.
The estate
is NOT open to
the public. |
On 17SEP1944 a Horsa glider with
chalk number 413 was forced to
make an emergency landing near
Dongen because of a broken tow
cable. The glider was part of
�A� Squadron, No. 8 Group,
transporting General Frederick
Browning�s headquarters. On
landing the crew was attacked by
a group of German soldiers and
one crew member was killed.
After interrogation and having
searched the plane, the Germans
found a document, probably the
day order of the 101st airborne
Division. It was handed over to
Generaloberst Student who in
turn was unable to contact
Feldmarschal Model. It was
therefor impossible to pass on
the information in this document
to German commanders in the
Arnhem area of operations. But
Student himself was now aware of
the route of advance of XXXth
corps, the drop- and landing
zones and the objectives of the
101st. The document also
included the transport schedule
of 18 and 19SEP1944. Using this
information, Kurt Student was
able to reorganize his forces.
|
Factor Most Dangerous
Course of Action
Germany�s strategic reaction
facilitated the flexible use of
military assets. 15th Army units
were pulled away from the
Scheldt Estuary and provided the
bulk of the infantry used to
challenge Operation �Market
Garden�. Heavy tank battalions
were rushed to the area by
train. It was Germany�s ability
to prioritize these trains, even
in late 1944, that meant British
and American paratroops with
only light anti-tank
capabilities, had to deal with
Panther tanks and Tiger II�s.
|
|
CONCLUSION:
Operation "Market Garden"
failed because the ground forces
did not reach all the areas
captured by airborne forces.
It is the opinion of this
agency that the battle was as
much influenced by factors of
German fighting abilities as it
was by Allied tactical errors.
Moreover the plan for Operation
"Market Garden" had too many
"moving parts" in which the
failure one task led to a chain
reaction of failure. |
|
EXHIBITS:
This agency is a regular
explorer to the Area of
Operations of "Market Garden"
and has repeatedly visited
numerous locations that are
indicative of the complicating
factors that led to the failure. |
|
(click to enlarge)

_small.jpg) 
_small.jpg) _small.jpg) _small.jpg) _small.jpg)
Fig.: From top to bottom:
- Delay of 30th Corps at
Valkenswaard: Metal detecting at
the German ambush site in 2013.
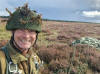
- Drop zones of 1st British
Airborne Divison far from
objective:
Round canopy jump
on Ginkel Heath in 2022.
-
Delay at destroyed bridge at
Son:
Royal Netherlands Army
constructed a Bailey bridge at
this location in 2014.
-
Delay until Nijmegen Bridge is
captured:
Reenacting the Waal
River Crossing in 2024.
- The
Bridge Too Far:
John Frost
Brige in 2014 |
|
Back to Battle Studies
 |
| |


.jpg)
.jpg)
.jpg)
.jpg)
.jpg)
.jpg)

.jpg)
.jpg)
.jpg)
.jpg)
.jpg)
.jpg)
.jpg)
.jpg)
.jpg)
.jpg)
.jpg)
.jpg)
.jpg)
.jpg)
.jpg)
.jpg)
.jpg)
.jpg)
.jpg)
.jpg)
.jpg)
.jpg)
.jpg)
.jpg)

.jpg)
.jpg)
.jpg)
.jpg)
.jpg)

.jpg)