|
File No.:

Title: "World War Two British
Paratrooper Helmet found near Arnhem
Bridge"
Investigation made at: The
Netherlands
Period Covered: 17SEP1944 –
1SEP2024
Date: 20SEP2024
GPS Location: 51°58'35.6"N
5°54'43.7"E
Case Classification:
Description of a World War Two
British Helmet Steel Airborne Troops
which belonged to Royal Engineers
sapper James "Ginger" Oldbury who
lost it during the Battle of Arnhem
in SEP1944.
Case Status: Case Closed |
(click to enlarge)
.JPG)
Airborne helmet
which belonged
to Royal Engineers sapper James
"Ginger" Oldbury |
REASON FOR INVESTIGATION:
This agency
was shown a British World War Two
paratrooper helmet from a collector
who wishes to remain undisclosed. The helmet still had it
camouflage netting on it which was
secured by the fiber rim around the
outer edge of the steel headgear.
There was also a name written
inside: "Oldbury". The owner
explained to us that both the
provenance and details of the
original owner are known, leading
back to the historic Battle of Arnhem and more specific the
desperate defense of the Rhine River
road bridge by British airborne
forces in September 1944.
This
article describes details and
specifics of the relic and of the
soldier who wore it into battle. |
SYNOPSIS:
The owner whose identity will remain
undisclosed here, explained to us
that this helmet had belonged to:
|
|
(click to enlarge).jpg) |
Name: James Thomas "Ginger" Oldbury
Rank: Lance Corporal
Army Serial Number: 1871921
DOB: 6APR1917 in Coventry,
England
Date of Death: 6SEP1992 in
Coventry, England
Unit: "B" Troop, 1st
Parachute Squadron, Royal Engineers,
British 1st Airborne Division. |
James Oldbury was part of
approximately half of the Royal
Engineers in "B" Troop under command
of CAP Livesey.
Task of 1st Parachute Squadron,
Royal Engineers
British 1st Parachute Brigade, which
had been tasked with entering Arnhem
on 17SEP1944, had been assigned
various smaller units in addition to
its own three battalions. An example
of such a unit was 1st Parachute
Squadron, led by MAJ Douglas Murray.
The unit had the task of disarming
any explosive devices under the
railway bridge at Oosterbeek, the
pontoon bridge and the road bridge
in Arnhem. Murray's squadron was
divided into smaller elements and
distributed among other airborne
maneuver units, for them to have
sappers at their disposal during the
advance.
While the deputy commander, Captain
S. George, stayed behind with half
of "C" Troop (approximately 20
sappers) on the Landing Zone at Renkum to collect supplies and
engineering equipment, the other
elements reported to the battalions
they were temporarily assigned to.
CAP W. Cox and the other half of "C"
Troop joined 3rd Parachute
Battalion. They would proceed along Utrechtseweg to the center of Arnhem.
Half of "B" Troop, commanded by CAP
Tom J. Livesey and LT Peter T.
Stainforth, meanwhile reported to
LT-COL John D. Frost's 2nd Parachute
Battalion.
This unit would travel to
the bridges in Arnhem along the
southernmost route, code name "Lion
Route".
LT Stainforth and four
sappers were to go with MAJ Victor
Dover's "C" Company to disable
explosive charges under the railway
bridge at Oosterbeek after its
capture. Unfortunately this was
never accomplished due to the enemy
destroying the bridge upon arrival
of the first British airborne
troops.
Since "Lion Route" ran close to all
the bridges, the remainder of the
1st Parachute Squadron followed
brigade headquarters of the 1st
Parachute Brigade, which arrived
behind the 2nd Parachute Battalion.
CPT Livesey's
group arrived around 2015 of 17SEP1944
and took positions in a house on Marktstraat. They were placed under
the command of MAJ Tatham-Warter,
the commanding officer of
"A"
Company.
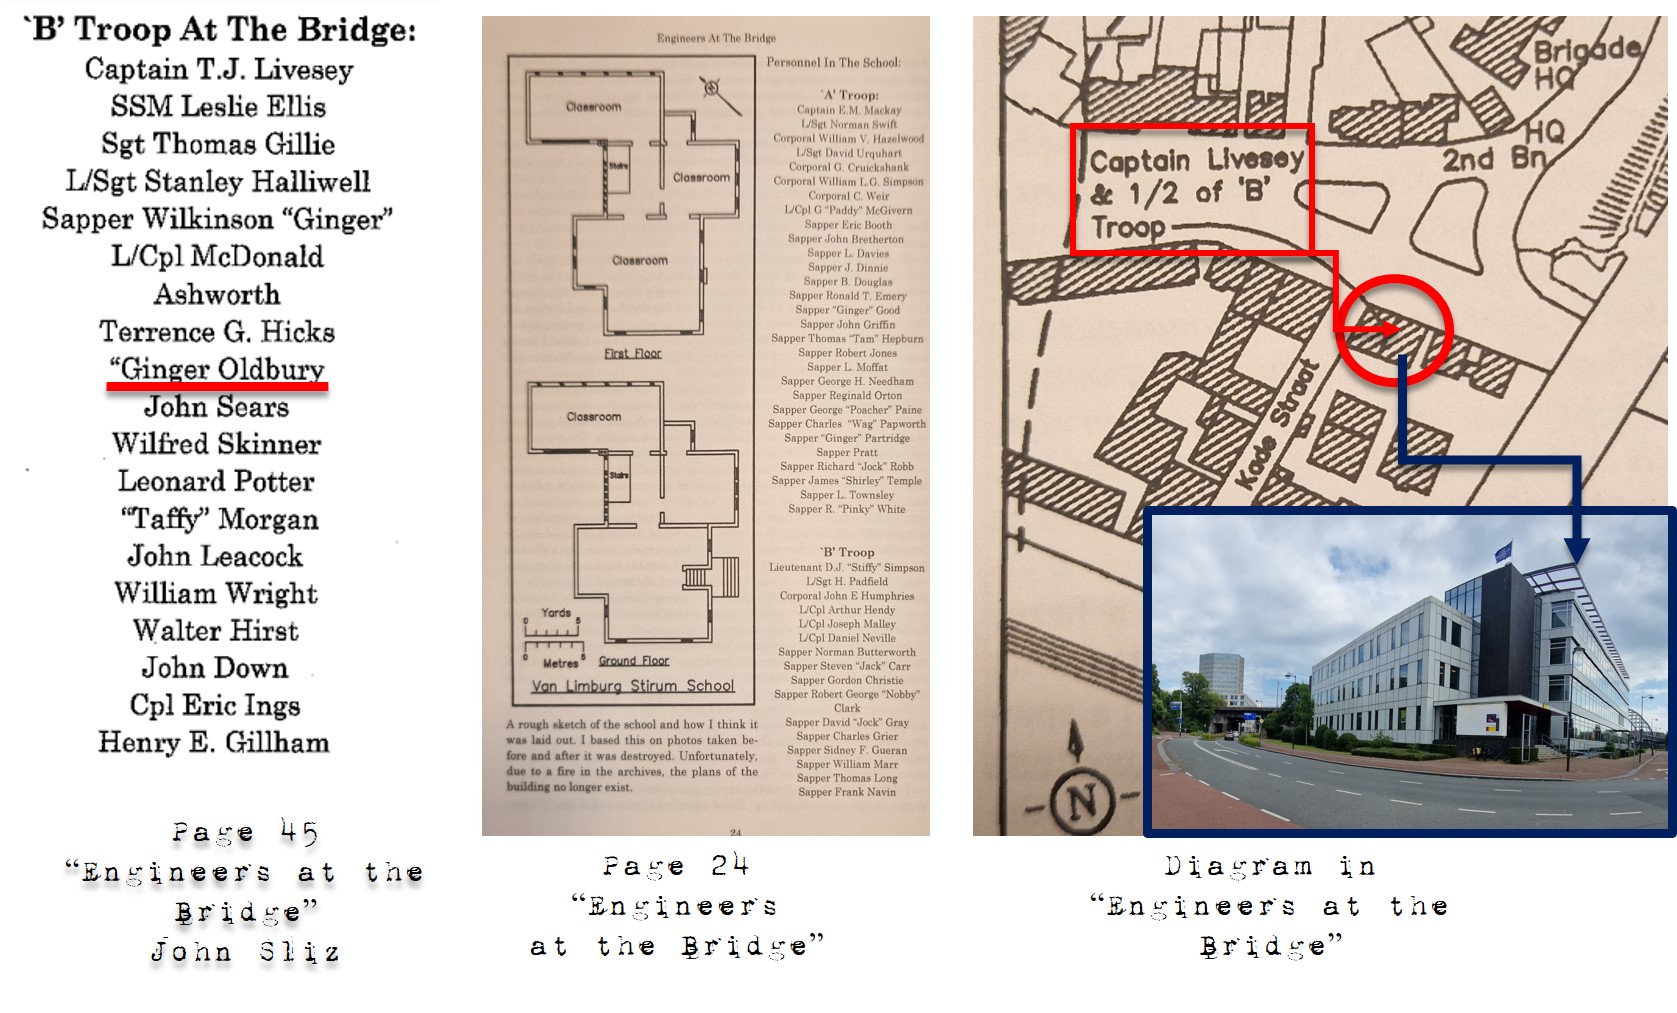
James Oldbury’s fighting position
From the 2010 book "Engineers at
the Bridge, the 1st Parachute
Squadron Royal Engineers at Arnhem",
by John Sliz (ISBN 0978383842) we know
that Oldbury was part of the
Engineers element that took position
in a house on the corner of
Marktstraat and Kadestraat. The book
features a list of sappers in this
position within the Bridge perimeter and
also a diagram of where
these houses were situated.
|
|
(click to enlarge)
 |
|
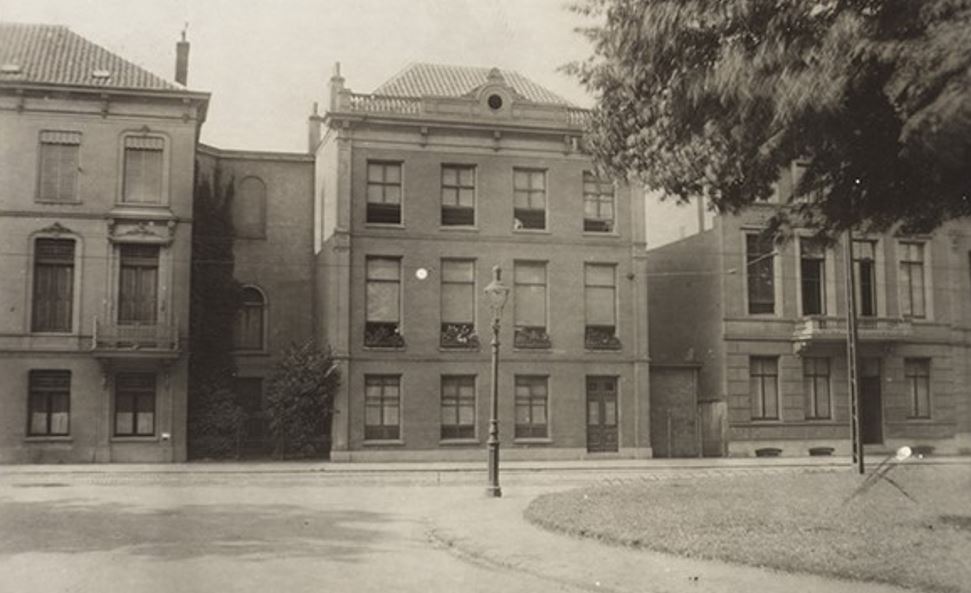
From the Gelderland provincial
archive we have these photos of the
houses No. 6 and 8 Marktstraat as they looked just prior to
the battle. |
|
(click to enlarge) |
|
 |
 |
|
No. 6 right and
No. 8 left. |
No. 8 right and
No's 10 & 12 to the left. |
|
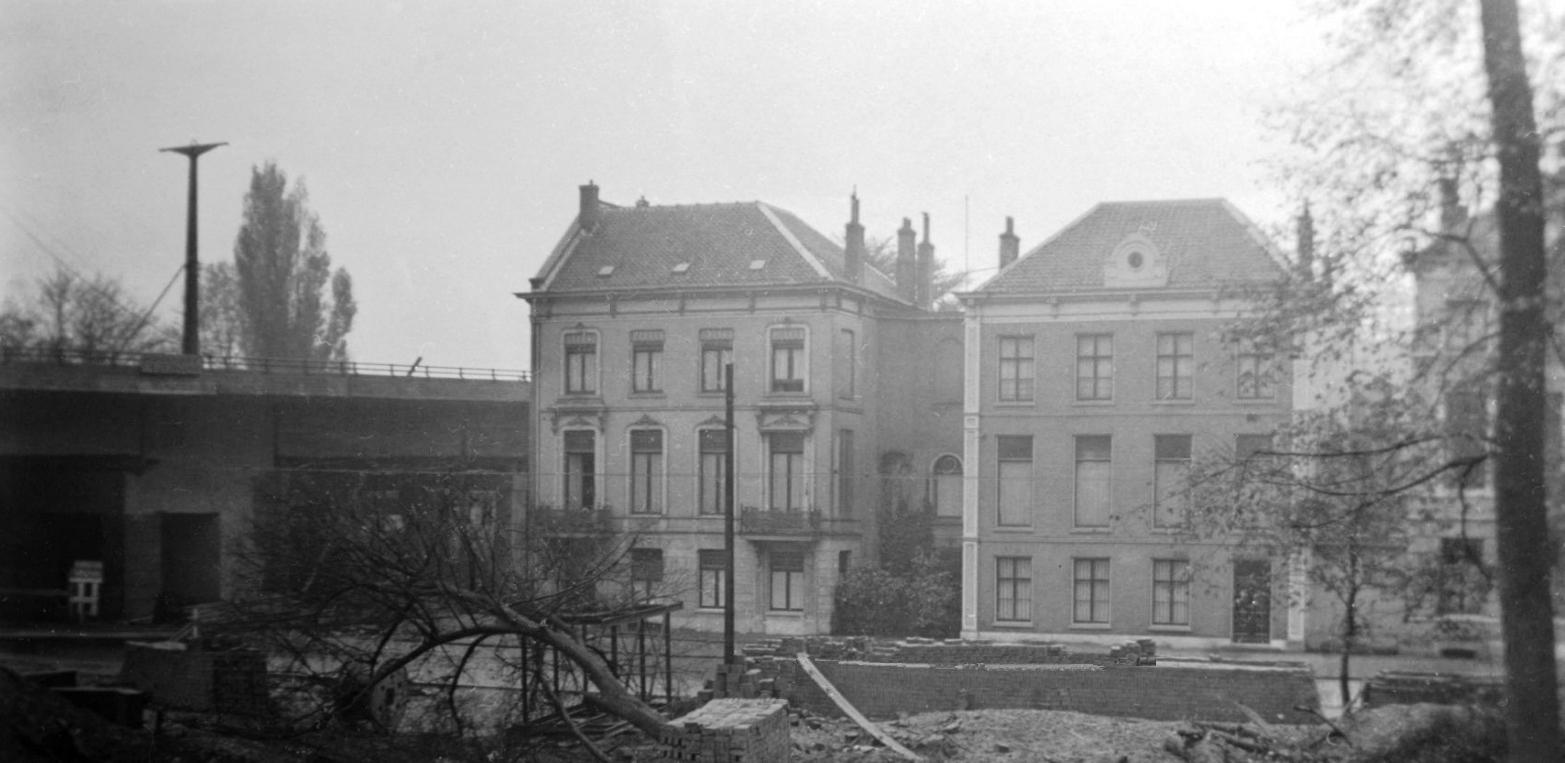
No's 10 & 12
Marktstraat still intact.
Note
the northern onramp on the
left. |
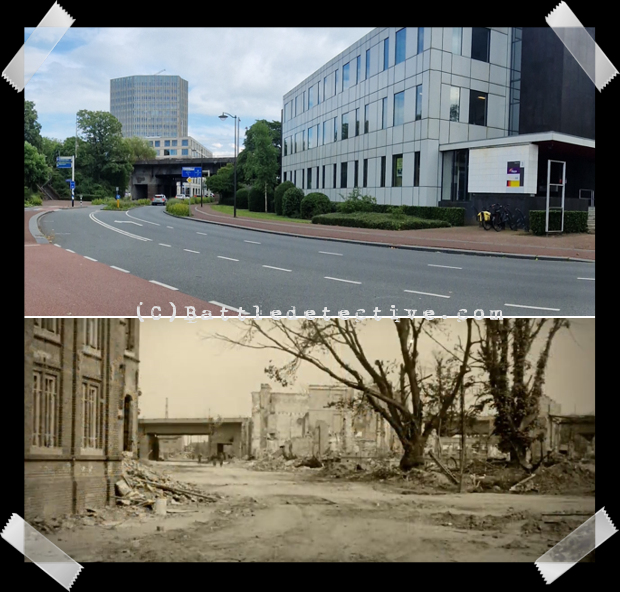
After the battle the lay-out of the
streets around the northern ramp of
the road bridge has changed
drastically.
A very comprehensive website about
Marktstraat during the war and
especially during the battle for the
bridge can be found
here.
The stretch of pavement
where these houses were on Marktstraat is now Oranjewachtstraat
(named after a local group of World
War Two resistance fighters) and
approximately on this site is a
modern building housing the offices
of several businesses and
organizations today. |
|
(click to enlarge)
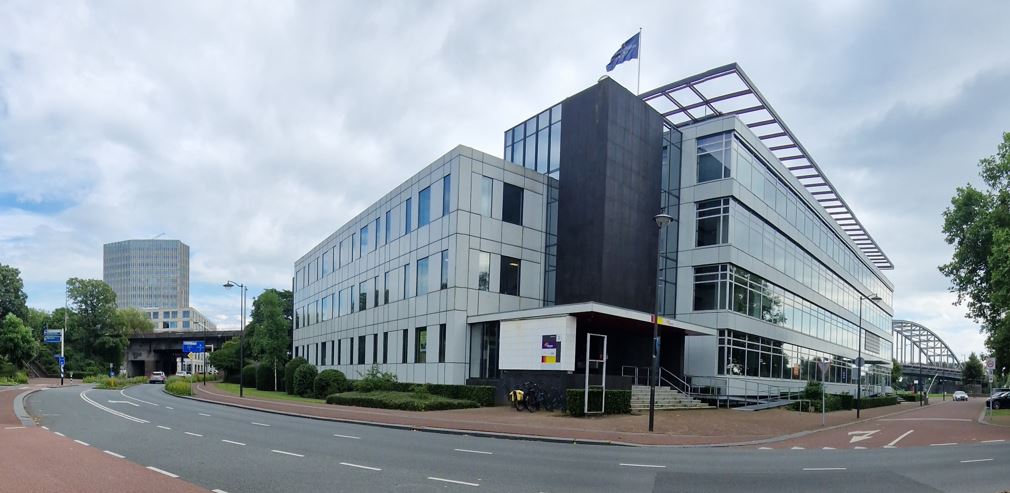
The
corner where No's 6 & 8 Markstraat
used to be.
Note the road bridge span on the
right and the northern onramp on the
left. |
WIA & POW
In his position near the bridge
James Oldbury was wounded in action
and was eventually taken POW by
German forces. He was treated for
his wounds and sent to the Stalag
IV-B (4B) POW holding facility near Mühlberg
in Eastern-Germany. |
|
(click to enlarge)
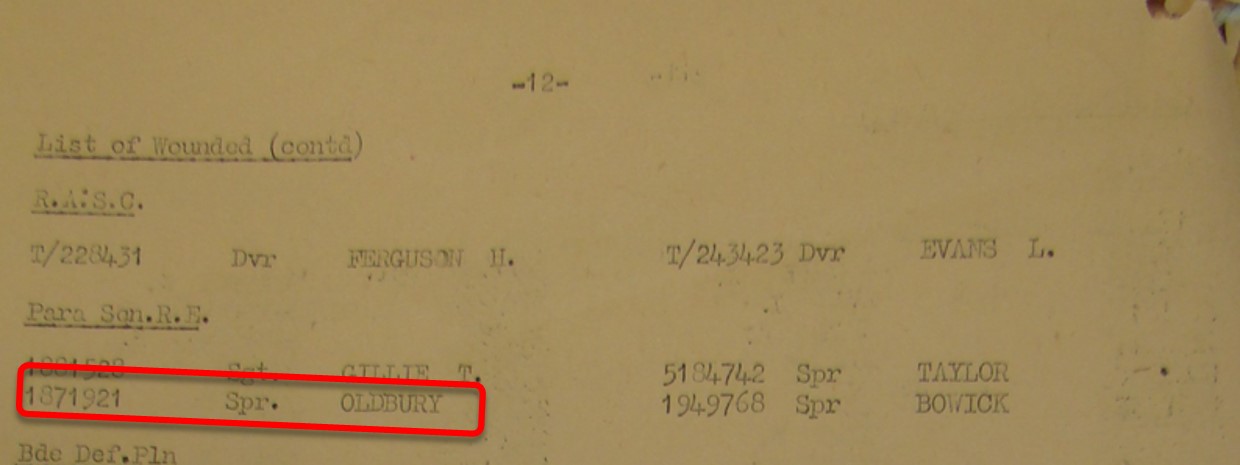
Sapper James
Oldbury is recorded wounded on a
casualties list for 1st Airborne
Division. |
Provenance of the relic
The owner of this helmet
explained that it had seen
daylight after having been hidden
inside a building on Steenstraat in
Arnhem for many years after the end
of World War Two. How it ended up in
the structure from which it surfaced
is unknown but the presence on
Steenstraat is relevant.
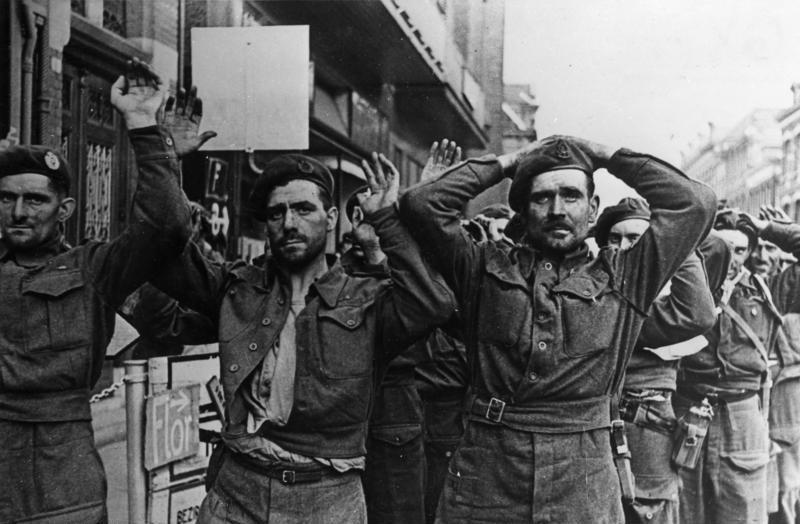
Photographic evidence shows several
Royal Engineers sappers and members
of other airborne units shortly
after their surrender on or near Steenstraat. |
|
(click to enlarge) |
|
 |
|
 |
Members of British
Airborne Royal Engineers and the
Royal Army Ordnance Corps surrender
on Steenstraat. As these are all
seemingly unwounded soldiers it is
likely that James Oldbury who had
sustained wounds while in his
fighting position has already been
taken away for medical care
when this photo was taken. |
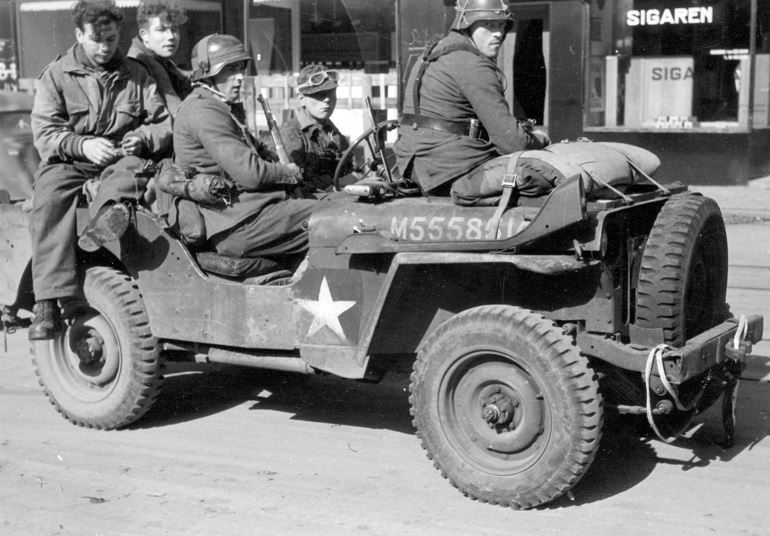
|
On almost the same
corner two British Prisoners of War
are seen riding in the back of a
jeep originally belonging to their
own unit, now driven by their German
captors. |
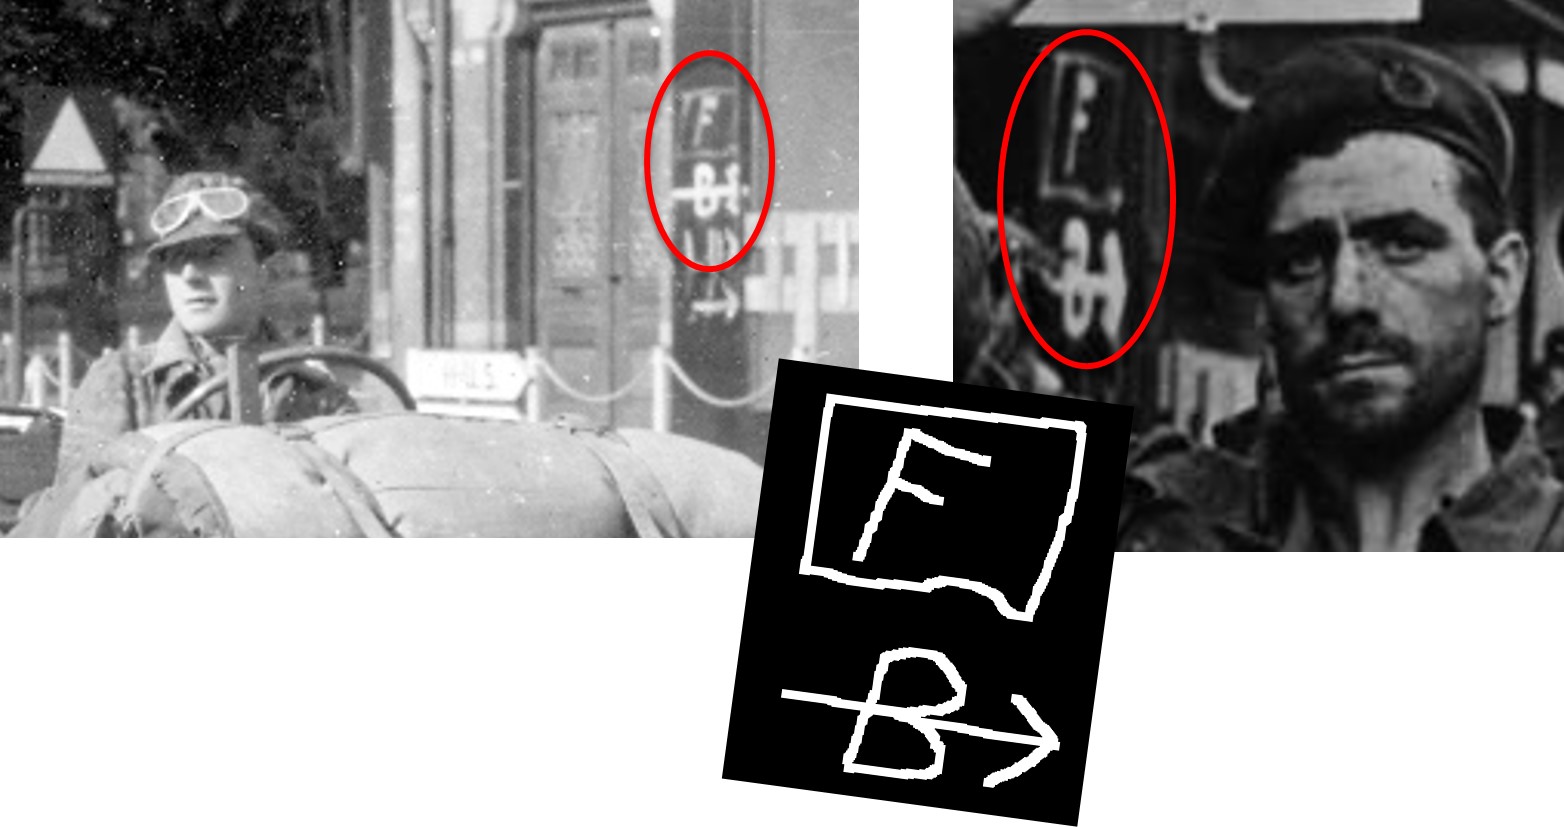
Proof that this is indeed the same
corner can be found in the same
crude tactical German graffiti on
the corner building in the
background of the photos: |
|
(click to enlarge)
 |
|
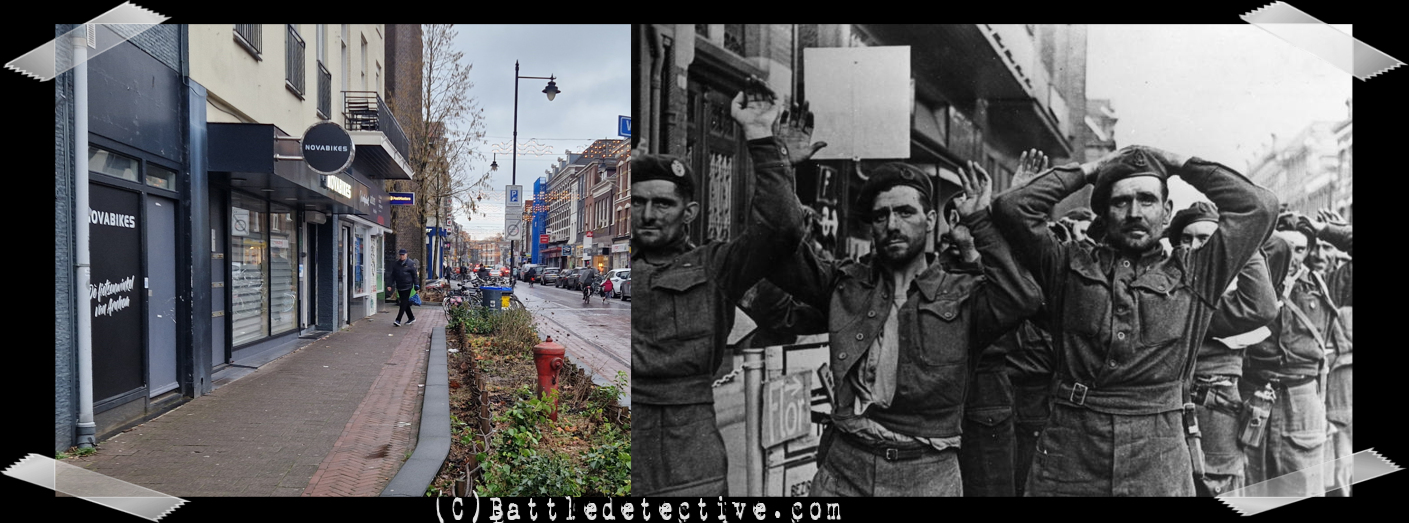
Interestingly another batch of
sappers surrendering to the Germans
was photographed on Johan van
Oldebarneveldstraat in Arnhem. Some
of them are recognized as defenders
of the school buildings on the
eastern slope of the onramp of the
road bridge. For these
identifications readers are referred
to our
Now & Then Holland 1 section. |
|
(click to enlarge)
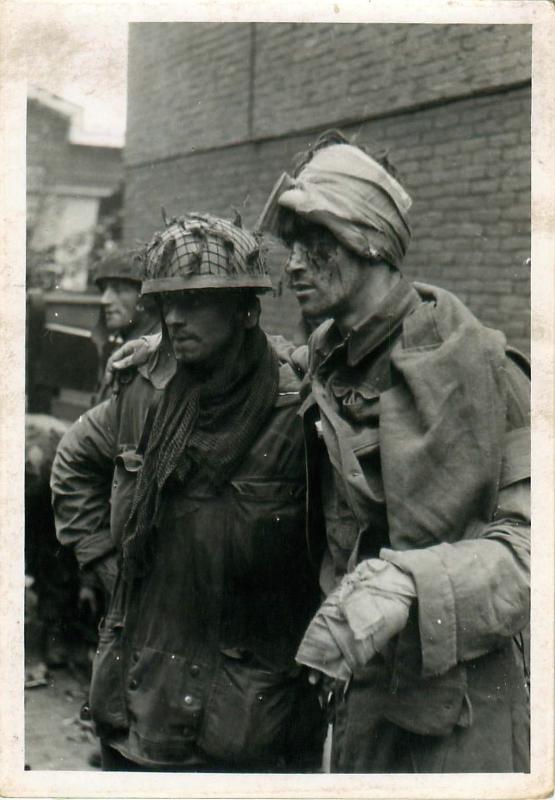 |
Note also in this photo the use of
the HSAT Mk1 helmet’s fiber rim to
secure a camouflage net, in this
case the helmet
worn by Sapper Charles Grier who was
also a member of the 1 Parachute
Squadron, Royal Engineers.
It is therefore this agency’s theory
that the sappers who surrendered
from the eastern slope were taken to
this location and that the Royal
Engineers who were taken prisoner in
the buildings on Markstraat were
taken to Steenstraat. |
|
(click to enlarge)
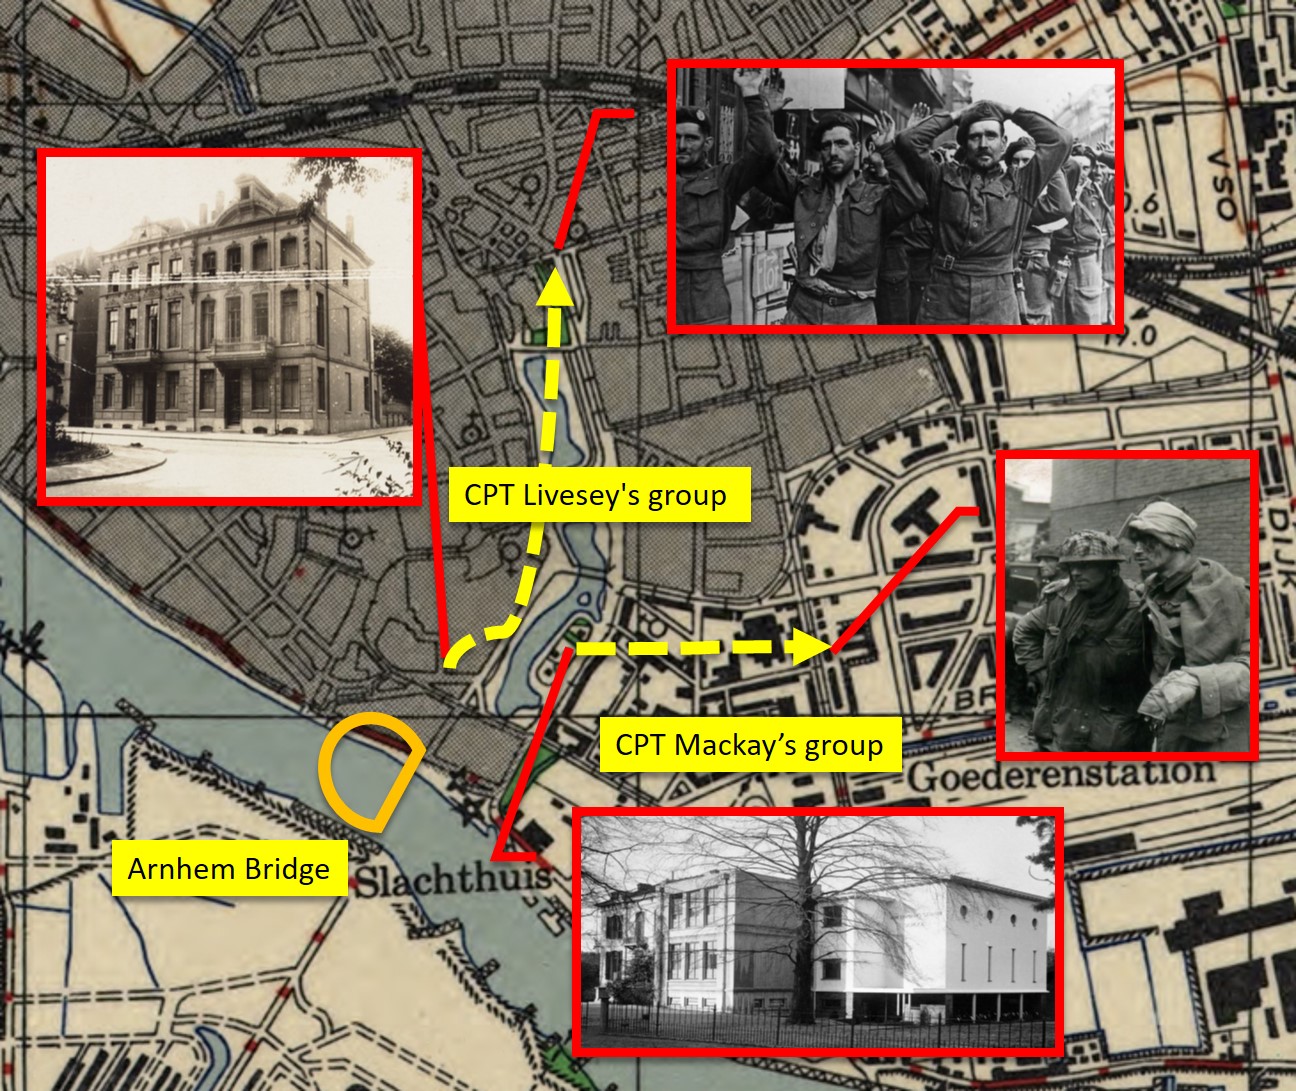
POW evacuation
routes from fighting positions of:
CPT Mackay's force of "A" Troop and
half of "B" Troop from the eastern
slope of the bridges' northern
onramp;
CPT Livesey's force of the
other half of "B" Troop from the
western slope of the ramp.
Note that on this map, used for
Operation "Market Garden" in
September 1944,
the Arnhem road bridge is not shown
as it was compiled of Dutch maps
from before the bridge's completion
in 1935. |
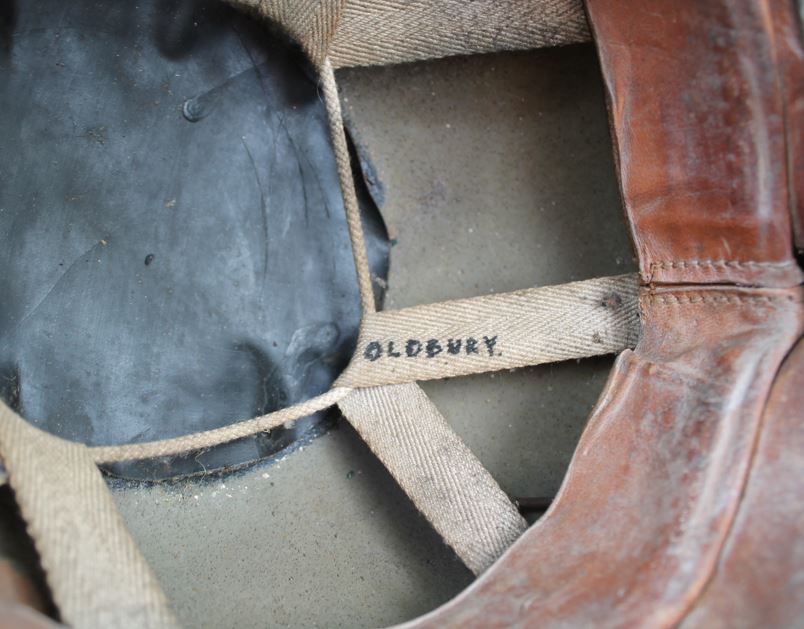
Of importance is also that after the
helmet was found,
family members of James Oldbury have
been shown the helmet with the handwritten name “OLDBURY” on
one of the web straps in the crown
inside it. The relatives
recognized the handwriting as James’s.
|
|
(click to enlarge)
 |
Description of the relic
This example is a typical World War
Two British Helmet Steel Airborne
Troops (HSAT). It is a steel helmet
for airborne (paratroopers and
gliderborne soldiers) which was
introduced in 1942 featuring a round
steel shell design and a thick
vulcanized fiber band rim, along
with a four-point leather chinstrap
system and a band of Sorbo rubber
for padding. This type of helmet is
usually referred to as a "fiber rim para helmet" or
"HSAT Mk1 helmet ".
The helmet is a size 7 1/8 (inch)
and made in 1942 by Briggs Motor
Bodies Ltd of Dagenham, who made
helmets for the British Military
until 1943. |
|
(click to enlarge)
_small.JPG)
_small.JPG)
_small.JPG)
_small.JPG)
 |
Fiber rim and woven camouflage
net with burlap strings
The helmet is covered with an early
made woven net with round holes
instead of the more often seen
knotted type. Burlap strings are
attached to the net which is secured
to the helmet by the fiber rim. This
has most likely been done by James
Oldbury by removing the rim, shaping
the net around the helmet and
reattaching the rim to hold the net
in place. |
|
(click to enlarge)
.JPG)
.JPG) |
|
This practice can be seen on more
photographs taken during the Arnhem operation and is not
necessarily an Engineers tradition as
this image of a mortar team in the Oosterbeek perimeter shows: |
|
(click to enlarge)
.jpg) |
Memories of James "Ginger"
Oldbury
Family Member
A family member had these memories
of the original owner of the helmet:
"A personal recollections that I
have from talking to James Oldbury
about his experiences in Arnhem.
He was a carpenter by trade, he told
me they held the bridge for just
over three days, with only rations
for twenty four hours, due to back
up not reaching them from Nijmegen.
SS panzer troops were already fitted
and ready, although intelligence
information had said they were
unprepared.
James was one of the first to walk
over the bridge, on arrival saw the
Germans playing cards.
At one point during the battle, he
was hiding in a house, when a German
soldier looked in and began shooting
at the window ledge with a machine
gun.
Later on he was in a garden with
forty five others, only six survived
from his unit, they were known as
the lucky six, the German soldiers
were shouting in perfect English
"why don't you give yourselves
up? whilst leaping over the wall and
throwing grenades.
The German soldiers were allowed in
to collect the wounded, which was a
mistake as they were able to take a
note of all of their positions. |
|
James managed to crawl away to hide
in a barn, that had pop bottles in
it.
A tank pulled up outside and fired a
shell in, the bottles didn't break,
and it felt like he was swimming in
them when he tried to stand up. |
(click to enlarge)
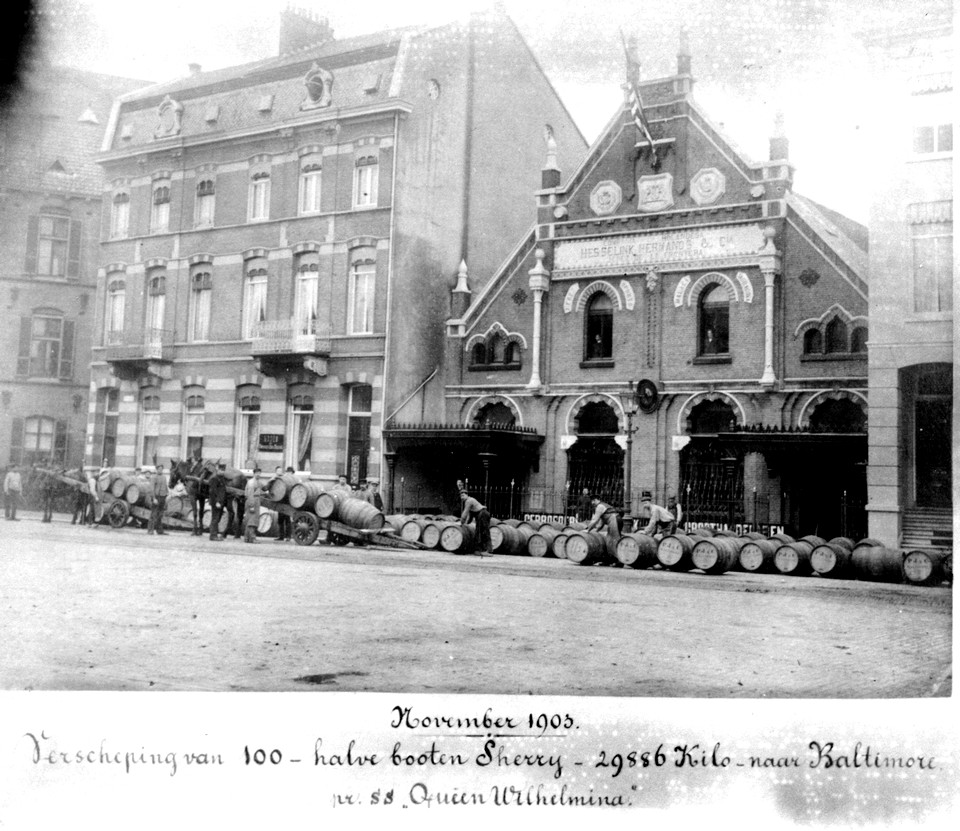
It is our theory that James
crossed Markstraat and entered the
warehouse of the Hesseling wine
trading company where he found wine
not only stored in wooden barrels
but also the sparkling variety in
thick glass bottles. |
|
Ammunition was dropped during the
battle, but it was recovered by the
Germans due to the proximity of the
bridge, unfortunately back up was
unable to reach the 1st Airborne
Division |
When he was taken prisoner he was
held locally for a time in barns,
then transported standing in cattle
trucks to Germany, days without food
and facilities. He was held for nine
months Stalug 4B over the river Elb
there were two thousand prisoners in
the camp.
Towards the end of the war, he spent
six weeks in Russian hands, in near
starvation, hardly any rations or
supplies or Red Cross aid, At this
stage of the war, whilst in the
prison camp he had pneumonia and was
critically ill. When he was finally
released he saw prisoners being fed
lemon cake, which was really white
bread, which he had not seen for
long time He came home in a
Lancaster Bomber, and was hungry for
months afterwards.
13,000 were lost from the Airborne
Division alone, 10,000 in the first
Airborne, less than 2,000 survived”. |
Comrade in Arms
Lance-Sergeant Harold Padfield,
also of "B" Troop 1st Parachute
Squadron Royal Engineers but
deployed on the eastern ramp during
the battle for the bridge,
remembered this about James Oldbury:
"Sapper James ("Ginger") Oldbury
was a Regular Soldier who joined the
Royal Engineers in 1938. He was
serving in Gibraltar when WWll broke
out and, in 1942, he volunteered for
Airborne Forces. He became a
parachutist and was posted to the
1st Parachute Squadron RE when it
was in its infancy.
He was a member of "B" Troop when
the Squadron was ordered to go to
North Africa on 8th November 1942.
He dropped at Depienne in Tunisia
and saw action throughout the
campaign there, as well as those in
Sicily and Italy in 1943, before
being taken prisoner of war at
Arnhem in September 1944. |
(click to enlarge)
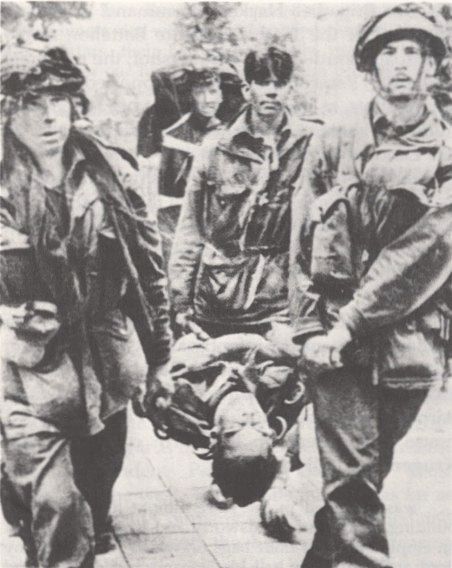
Harold Padfield (left) helping to
carry a wounded comrade on Van
Oldebarneveldstraat after being
captured at Arnhem Bridge.
Copyright: Bundesarchiv. |
During our tour overseas (North
Africa, Sicily and Italy), beside
being a very fit person, I never
knew of him drinking alcohol but he
worshipped the sun and the sea and
he certainly got plenty of that.
"Ginger", as he was known to
everyone in the Squadron, was a very
pleasant and easy-going person who
was popular with everyone, without
ever being a member of any
particular group, and he was
certainly one of the "characters" in
the Troop. Throughout his time in
the Squadron his great friend was
Wilf Skinner and they were always
together, on or off duty and in or
out of trouble; they were a great
team of their own"
Sadly Harold Padfield died aged
93 on 13DEC2014. |
|
Commanding Officer
Lieutenant Peter T. Stainforth
of 1st Parachute Squadron, Royal
Engineers recalled:
"I remember "Ginger" Oldbury well.
During the Arnhem Battle he was with
Trevor Livesey at Squadron
headquarters in the building close
to Col. Frost's headquarters."
|
(click to enlarge)

Peter Stainforth in 1942.
Image through Peter Stainforth.
Collection Freedom Trail Arnhem,
Gelderland
provincial archive. |
|
Exhibits: |
|
(click to enlarge)
 1) 1)
 2) 2)
 3) 3)
1) Now & Then on
Steenstraat in Arnhem; German
propaganda photo of British Royal
Engineers surrendering. It is this
agency's theory that these men
fought in the same area of the
bridge perimeter as James Oldbury
who was Wounded in Action.
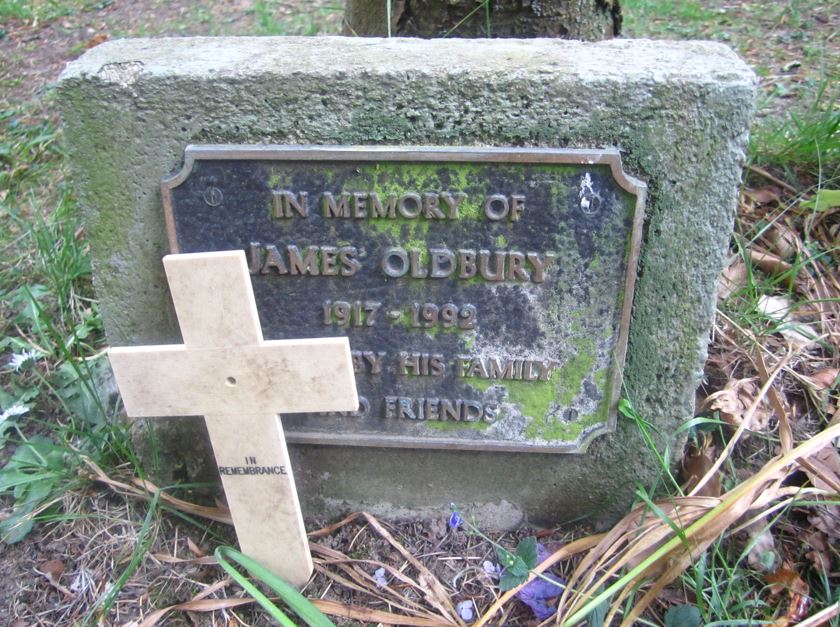
2) In 1992 James Oldsbury
passed away and was cremated; loved
ones did have an In Memoriam stone
installed in James Oldsbury's memory
in Coventry.
3) What was left of
Marktstraat and the house where
James Oldbury fought, after the
battle. |
|
CONCLUSION:
We are very thankful to the owner of the helmet and consider it
a privilege to describe and display
it here as Battle Relic #35.
Rarely have we been given the
opportunity to describe a Battle
Relic with such an amazing history
here.
This helmet has seen action at the
very heart of the Battle of Arnhem
and was worn by a participant of
Operation
"Market Garden" in September 1944.
The original wearer of this
parachutist's helmet was
wounded in action and remained a
prisoner of the Third Reich until
the end of the war.
Before being sent into captivity he
left this true Battle Relic behind
near where he fought 80 years ago to
the day of this publication. |
|

|
|
Back to Battlerelics
 |
|
|


.JPG)
.JPG)
.JPG)
